> ## Documentation Index
> Fetch the complete documentation index at: https://docs.rigreports.com/llms.txt
> Use this file to discover all available pages before exploring further.
# Version 2.0.3
## Release Notes - \[04/10/2026]
![Release Notes - [04/10/2026]](https://mintcdn.com/mi4/4JNwR2i_Dp9jNaBb/images/wbd.png?fit=max&auto=format&n=4JNwR2i_Dp9jNaBb&q=85&s=25ab541949a7476a844739f62f37928b) **🚀 New Features**
* Wellbore Diagrams
## Wellbore Diagrams
We're excited to introduce Wellbore Diagrams — a new feature that brings your well data to life in a clear, visual format directly within the platform.
With this release, users can generate wellbore diagrams automatically from previously entered job or report data, build them from scratch using manual entry, or create planned wellbore diagrams to map out well designs ahead of operations. Whether you're documenting a completed well, capturing current progress, or planning ahead, the diagram editor gives you a fast, flexible way to create accurate visual representations without leaving your workflow.
**Initial Release — Supported Diagram Types & Data**
This is the first release of the Wellbore Diagrams feature. Users can currently create vertical or horizontal wellbore diagrams with support for casing, perforation, and tubing data with packers. In a future release, we will expand diagram support to include plugs, gas lift valves, and full completion data.
We look forward to your feedback and are excited for the continued improvement of RigReports.
## Create New Wellbore Diagram
### Click Add New Diagram from Well page
**🚀 New Features**
* Wellbore Diagrams
## Wellbore Diagrams
We're excited to introduce Wellbore Diagrams — a new feature that brings your well data to life in a clear, visual format directly within the platform.
With this release, users can generate wellbore diagrams automatically from previously entered job or report data, build them from scratch using manual entry, or create planned wellbore diagrams to map out well designs ahead of operations. Whether you're documenting a completed well, capturing current progress, or planning ahead, the diagram editor gives you a fast, flexible way to create accurate visual representations without leaving your workflow.
**Initial Release — Supported Diagram Types & Data**
This is the first release of the Wellbore Diagrams feature. Users can currently create vertical or horizontal wellbore diagrams with support for casing, perforation, and tubing data with packers. In a future release, we will expand diagram support to include plugs, gas lift valves, and full completion data.
We look forward to your feedback and are excited for the continued improvement of RigReports.
## Create New Wellbore Diagram
### Click Add New Diagram from Well page
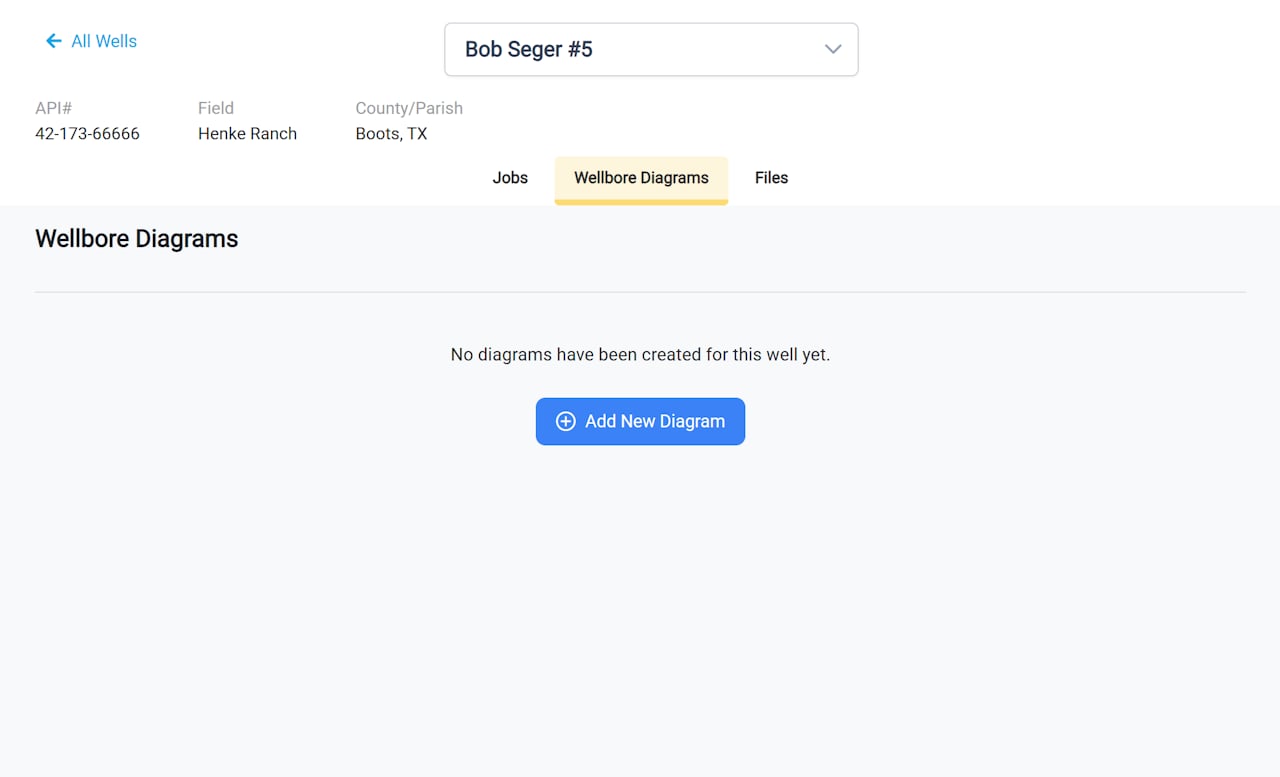 To get started creating a new wellbore diagram, click the **+ Add New Diagram** button from the Wellbore Diagrams tab of the well page in the Well Vault.
### Choose the Data Source
To get started creating a new wellbore diagram, click the **+ Add New Diagram** button from the Wellbore Diagrams tab of the well page in the Well Vault.
### Choose the Data Source
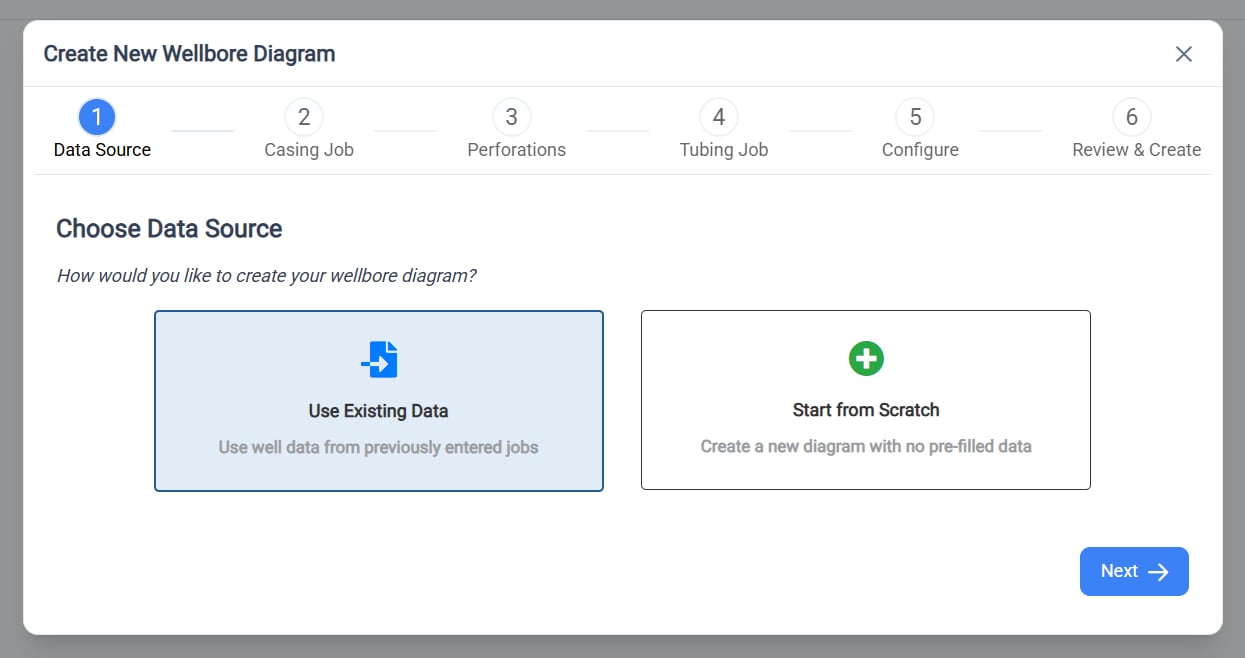 Next, choose the data source for your diagram from the options:
* **Use Existing Data** - Import casing, tubing, and perforation data from jobs already entered in RigReports. The system will automatically detect available jobs for this well.
* **Start from Scratch** - Enter all component information manually in the editor.
### Select the Casing Job
Next, choose the data source for your diagram from the options:
* **Use Existing Data** - Import casing, tubing, and perforation data from jobs already entered in RigReports. The system will automatically detect available jobs for this well.
* **Start from Scratch** - Enter all component information manually in the editor.
### Select the Casing Job
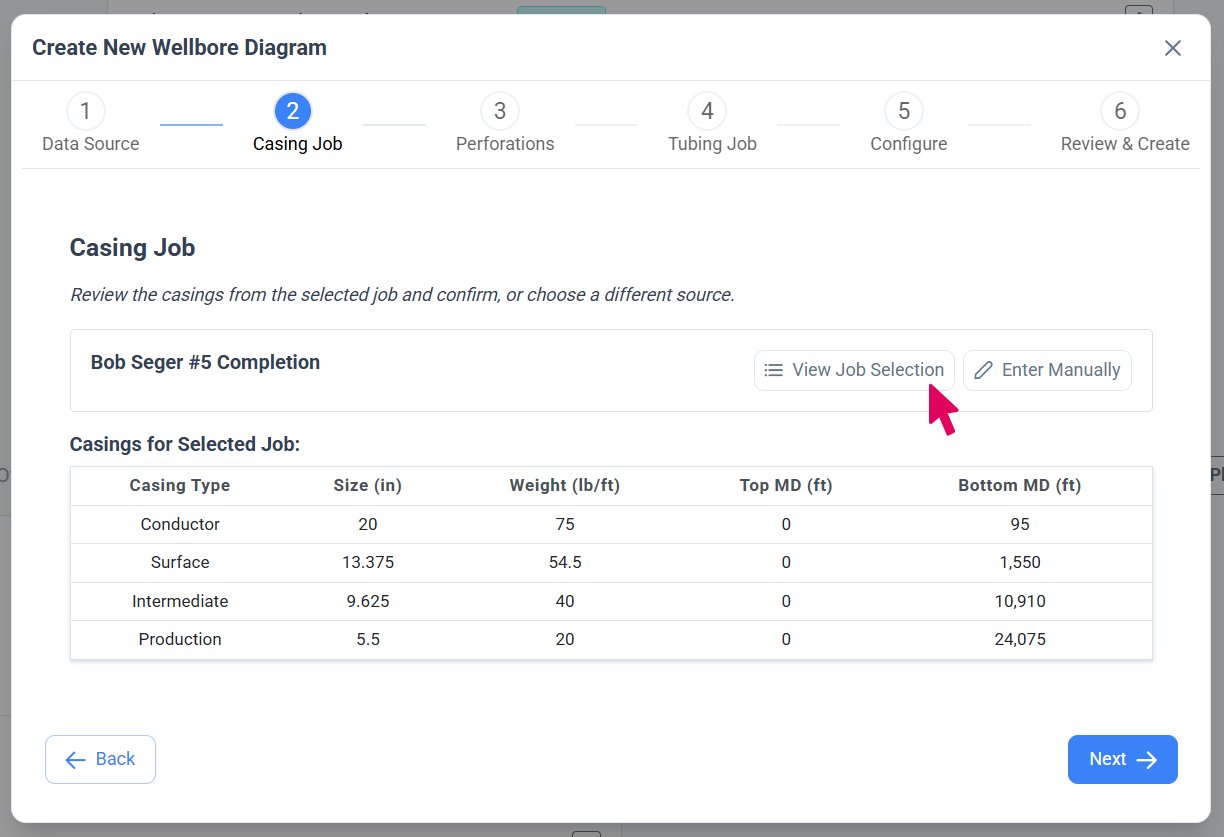 The system automatically selects the most recent job with casing data based on entry date and displays it in a card. The card shows the selected job name and provides two options:
* **View Job Selection** - Click this button to open a table showing all available jobs with casing data for this well. In the table, you can click **Show** next to any job to preview the casings associated with that job, or click **Select** to choose a job to import casings from.
* **Enter Manually** - Click this button if you prefer to skip importing casing data and enter it manually in the editor instead.
### Select the Perforation Job
The system automatically selects the most recent job with casing data based on entry date and displays it in a card. The card shows the selected job name and provides two options:
* **View Job Selection** - Click this button to open a table showing all available jobs with casing data for this well. In the table, you can click **Show** next to any job to preview the casings associated with that job, or click **Select** to choose a job to import casings from.
* **Enter Manually** - Click this button if you prefer to skip importing casing data and enter it manually in the editor instead.
### Select the Perforation Job
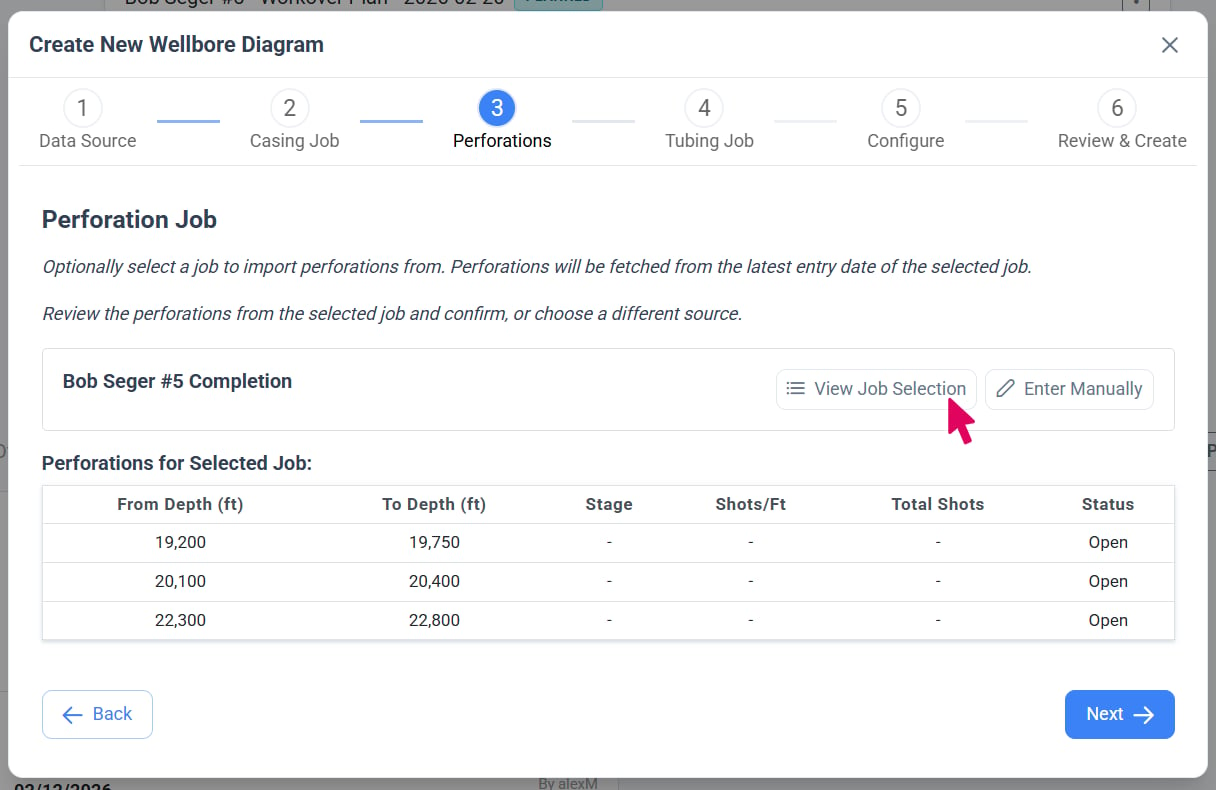 The system automatically selects the most recent job with perforation data based on entry date and displays it in a card. The card shows the selected job name and provides two options:
* **View Job Selection** - Click this button to open a table showing all available jobs with perforation data for this well. In the table, you can click **Show** next to any job to preview the perforation intervals associated with that job, or click **Select** to choose a job to import perforations from.
* **Enter Manually** - Click this button if you prefer to skip importing perforation data and enter it manually in the editor instead.
Perforation job selection is only available when a casing job has already been selected.
### Select the Tubing Job
The system automatically selects the most recent job with perforation data based on entry date and displays it in a card. The card shows the selected job name and provides two options:
* **View Job Selection** - Click this button to open a table showing all available jobs with perforation data for this well. In the table, you can click **Show** next to any job to preview the perforation intervals associated with that job, or click **Select** to choose a job to import perforations from.
* **Enter Manually** - Click this button if you prefer to skip importing perforation data and enter it manually in the editor instead.
Perforation job selection is only available when a casing job has already been selected.
### Select the Tubing Job
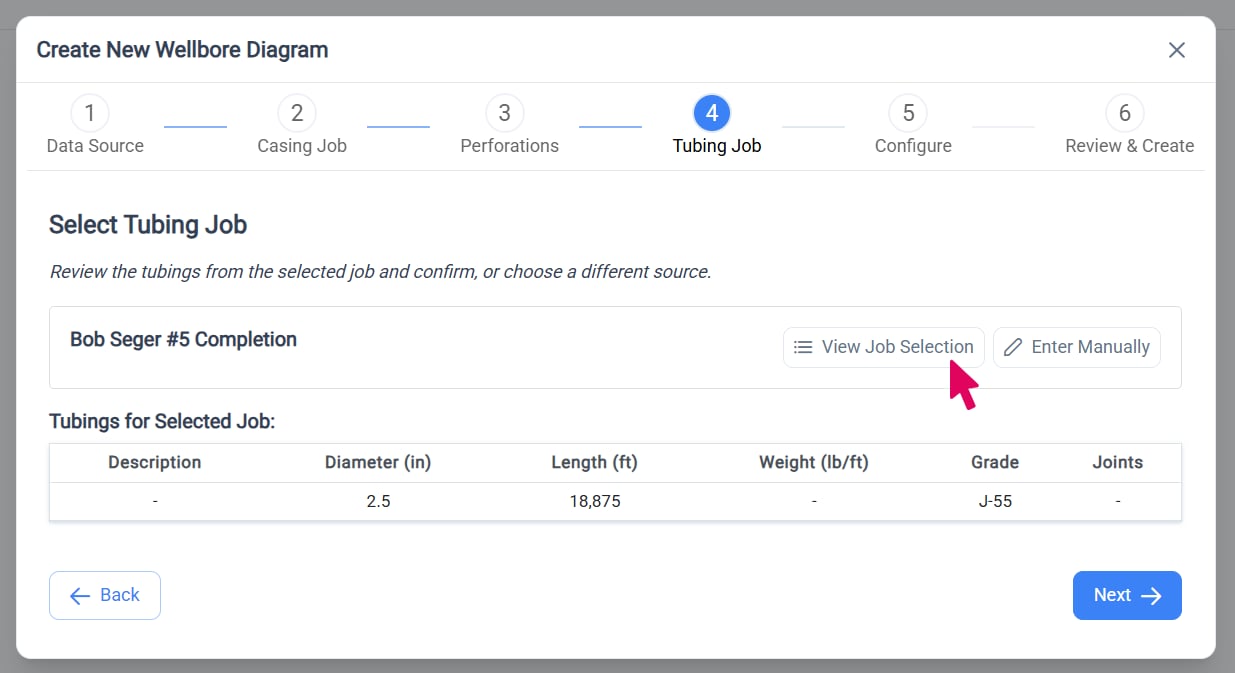 The system automatically selects the most recent job with tubing IN data based on entry date and displays it in a card. The card shows the selected job name and provides two options:
* **View Job Selection** - Click this button to open a table showing all available jobs with tubing IN data for this well. In the table, you can click **Show** next to any job to preview the tubing strings associated with that job, or click **Select** to choose a job to import tubing from.
* **Enter Manually** - Click this button if you prefer to skip importing tubing data and enter it manually in the editor instead.
### Well Type and Total Depth
The system automatically selects the most recent job with tubing IN data based on entry date and displays it in a card. The card shows the selected job name and provides two options:
* **View Job Selection** - Click this button to open a table showing all available jobs with tubing IN data for this well. In the table, you can click **Show** next to any job to preview the tubing strings associated with that job, or click **Select** to choose a job to import tubing from.
* **Enter Manually** - Click this button if you prefer to skip importing tubing data and enter it manually in the editor instead.
### Well Type and Total Depth
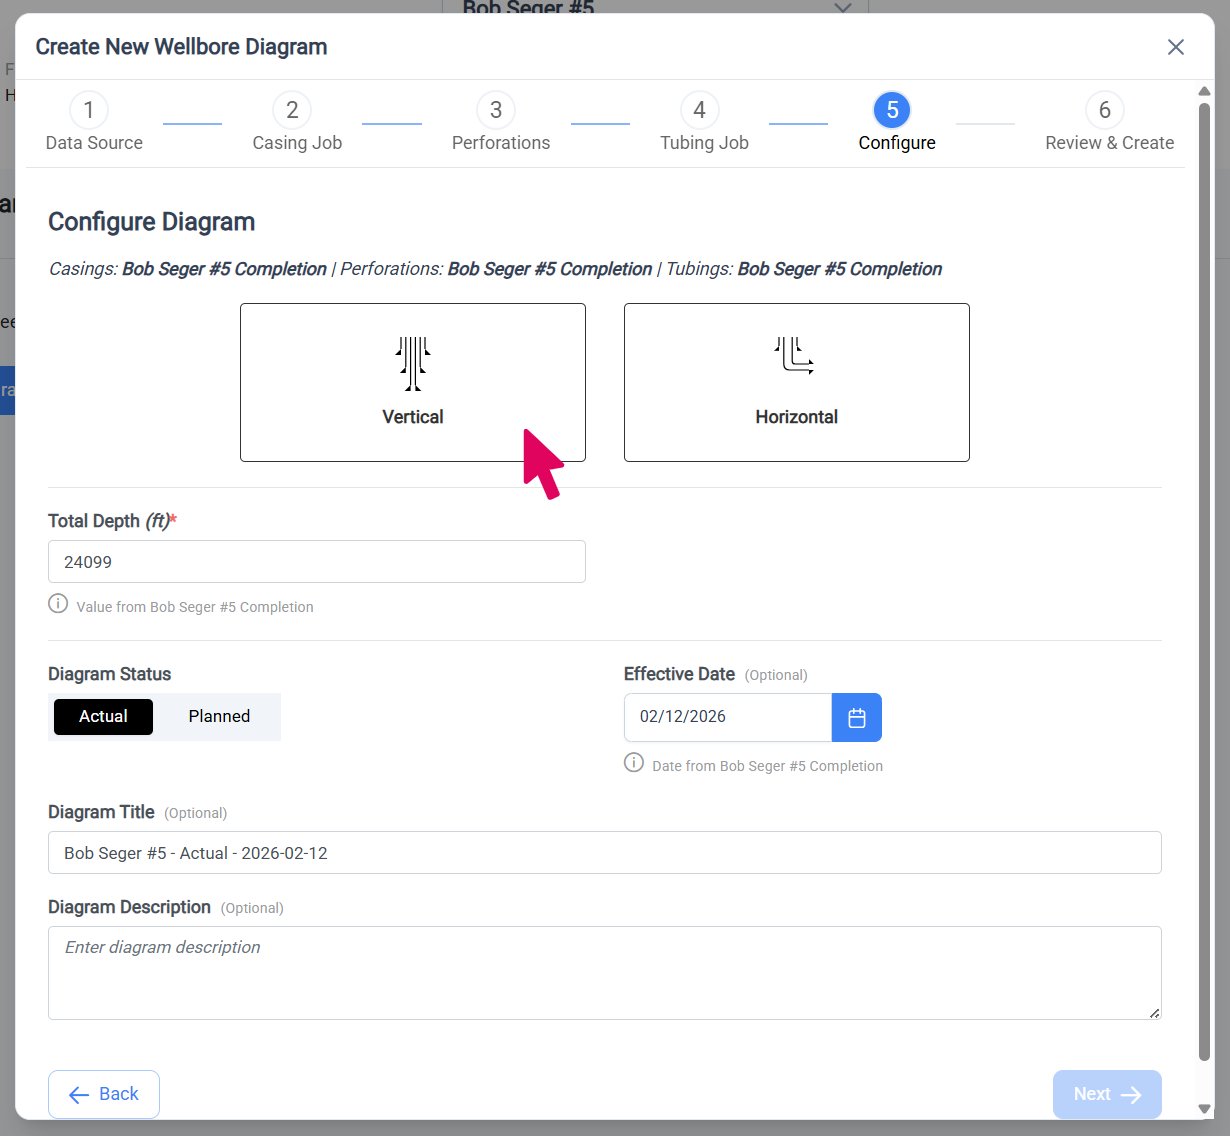 **Well Type**
Click on the box for the type of well that you will be diagramming. If you select Horizontal you will be given the chance to provide kickoff and end of curve values for your well.
**Total Depth**
Enter the total depth of your well. If you chose to import casings, perforations, or tubing from an existing job, the total depth value will be prefilled for you. You can manually edit the value if needed.
An informational note appears below the total depth showing which job the data came from.
### Horizontal Well Geometry
**Well Type**
Click on the box for the type of well that you will be diagramming. If you select Horizontal you will be given the chance to provide kickoff and end of curve values for your well.
**Total Depth**
Enter the total depth of your well. If you chose to import casings, perforations, or tubing from an existing job, the total depth value will be prefilled for you. You can manually edit the value if needed.
An informational note appears below the total depth showing which job the data came from.
### Horizontal Well Geometry
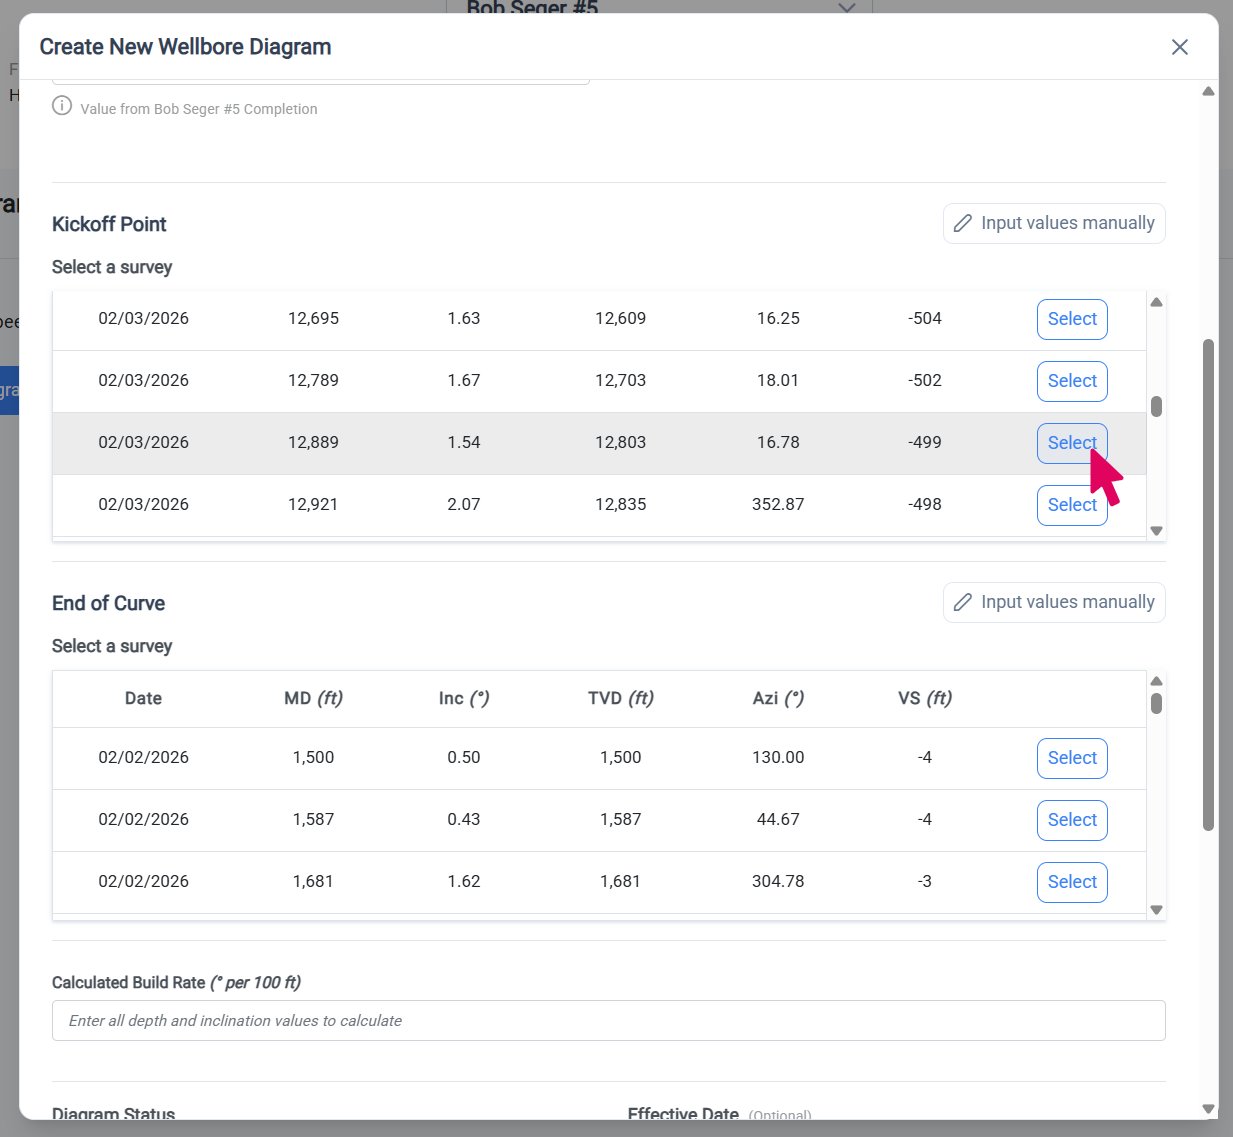 **Total Depth**
Enter the total depth for your well. If you chose to import casings, perforations, or tubing from an existing job, the total depth value will be prefilled for you. You can manually edit the value if needed.
An informational note appears below the total depth showing which job the data came from.
**Kickoff Point and End of Curve**
If your well has directional surveys, you will be able to select the kickoff point and end of curve from the surveys. In the kickoff section, a table will display all directional surveys for the well. Review the survey data and click **Select** on the row that represents your kickoff point. Repeat this process for the end of curve survey. If you need to change the values, click **Input Values Manually** to switch to manual entry mode.
If your well does not have directional surveys, you will be able to enter the measured depth and inclination manually. Build rate is calculated automatically from your kickoff and end of curve values.
### Complete Remaining Configuration
**Total Depth**
Enter the total depth for your well. If you chose to import casings, perforations, or tubing from an existing job, the total depth value will be prefilled for you. You can manually edit the value if needed.
An informational note appears below the total depth showing which job the data came from.
**Kickoff Point and End of Curve**
If your well has directional surveys, you will be able to select the kickoff point and end of curve from the surveys. In the kickoff section, a table will display all directional surveys for the well. Review the survey data and click **Select** on the row that represents your kickoff point. Repeat this process for the end of curve survey. If you need to change the values, click **Input Values Manually** to switch to manual entry mode.
If your well does not have directional surveys, you will be able to enter the measured depth and inclination manually. Build rate is calculated automatically from your kickoff and end of curve values.
### Complete Remaining Configuration
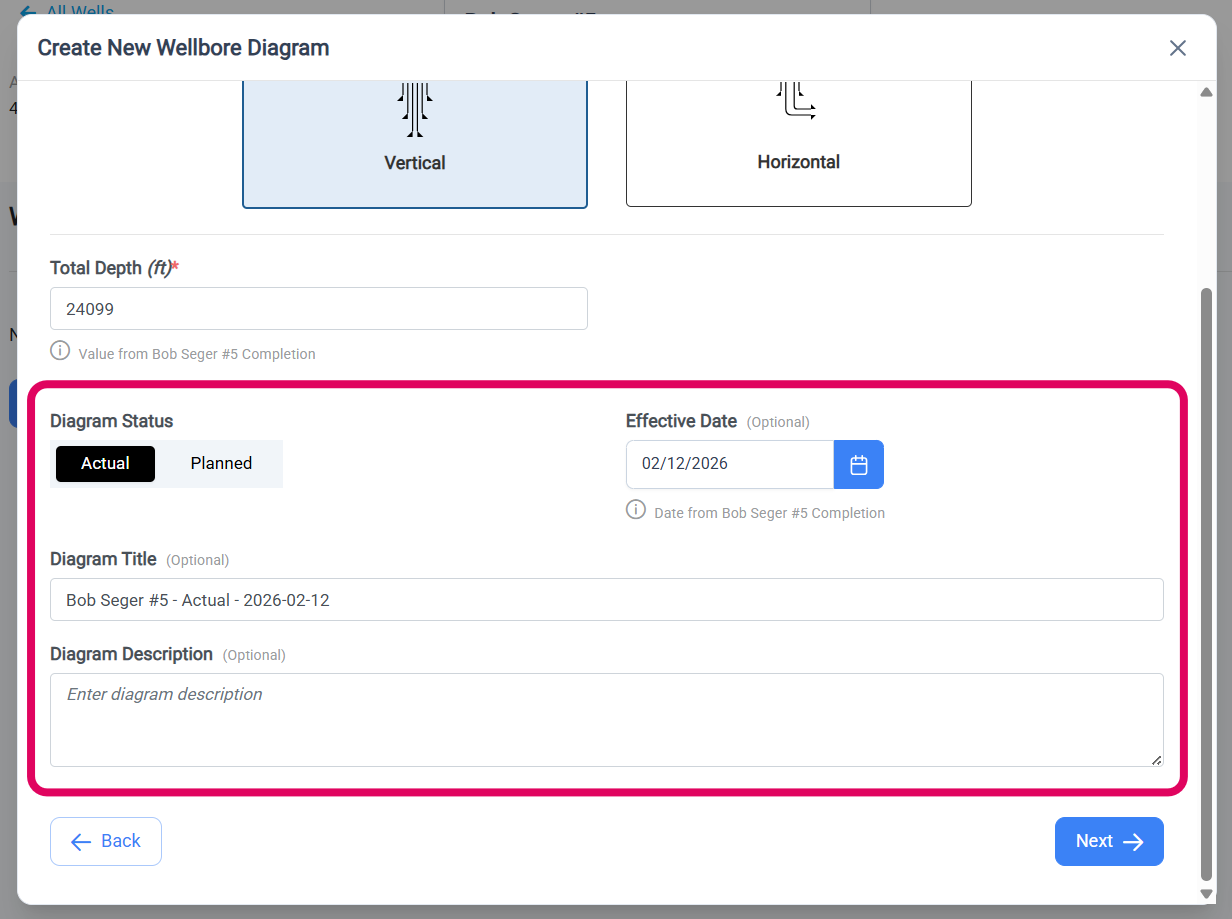 Complete the configuration of your diagram by selecting the diagram status and then optionally filling out the date, title, and description.
**Diagram Status Options:**
* **Actual** - This is used for actual (as drilled/completed) wellbore diagrams. You can note the date that the most recent changes were completed for the well.
* **Planned** - This is used to create planned wellbore diagrams for future drilling or completion changes. You can note the anticipated date of the drilling or changes to the well.
Just like total depth, the date value will be prefilled for you if you chose to import data from an existing job. You can manually edit the value if needed.
### Review and Create Diagram
Complete the configuration of your diagram by selecting the diagram status and then optionally filling out the date, title, and description.
**Diagram Status Options:**
* **Actual** - This is used for actual (as drilled/completed) wellbore diagrams. You can note the date that the most recent changes were completed for the well.
* **Planned** - This is used to create planned wellbore diagrams for future drilling or completion changes. You can note the anticipated date of the drilling or changes to the well.
Just like total depth, the date value will be prefilled for you if you chose to import data from an existing job. You can manually edit the value if needed.
### Review and Create Diagram
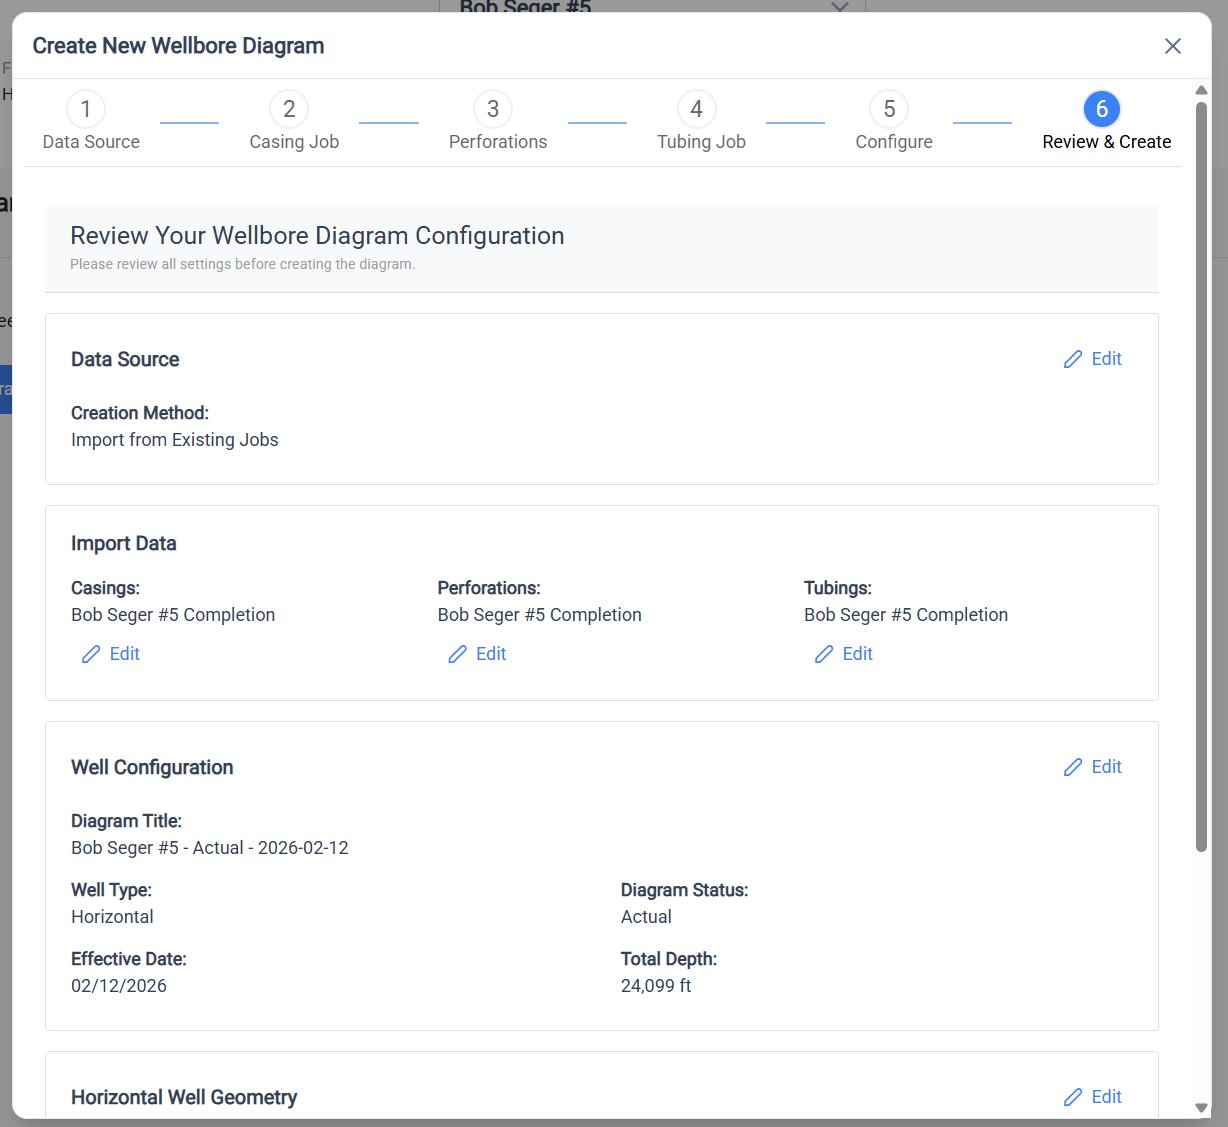 Review all your selections including:
1. Data source (existing jobs or from scratch)
2. Imported jobs (if applicable): casing job, perforation job, tubing job
3. Diagram configuration: well type, total depth, kickoff/end of curve, effective date
Verify that all information is correct. Once you click **Create Diagram**, the system will create your new wellbore diagram and automatically navigate you to the editor where you can review imported data, generate the visual diagram, and save it for viewing and export.
### Wellbore Diagram Editor
Review all your selections including:
1. Data source (existing jobs or from scratch)
2. Imported jobs (if applicable): casing job, perforation job, tubing job
3. Diagram configuration: well type, total depth, kickoff/end of curve, effective date
Verify that all information is correct. Once you click **Create Diagram**, the system will create your new wellbore diagram and automatically navigate you to the editor where you can review imported data, generate the visual diagram, and save it for viewing and export.
### Wellbore Diagram Editor
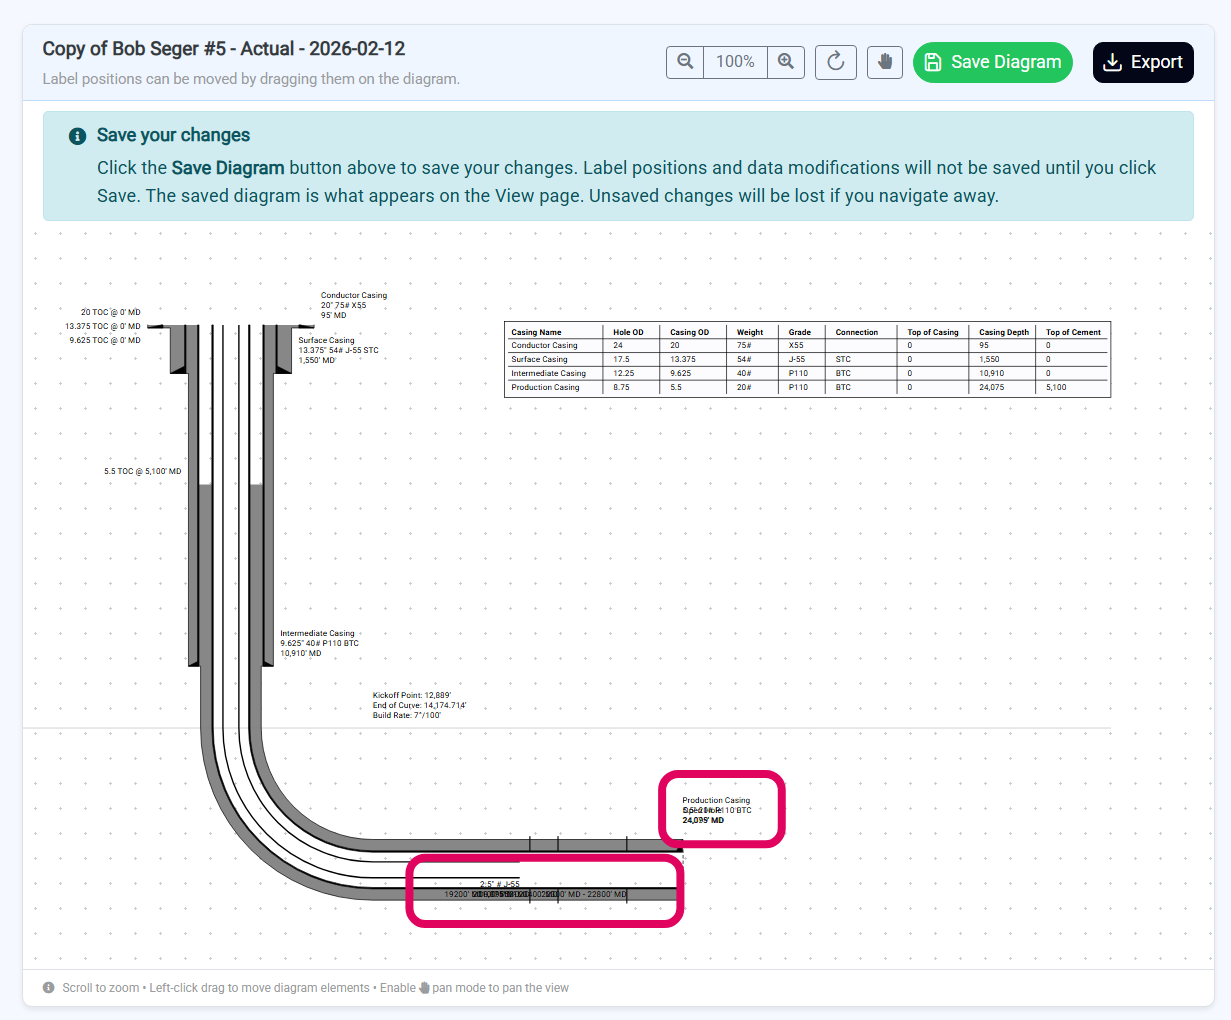 When your diagram is successfully created, you will be redirected to the Wellbore Diagram Editor page of your new diagram.
From there, scroll down to view your generated diagram. You can now adjust label positions to improve readability and then use the buttons in the viewer's header to save or export your diagram.
To reposition labels:
1. Ensure Pan Mode is off (hand button in the header should be gray)
2. Click and drag any label text or table to a new position
3. Release to drop the label
Remember to click **Save Diagram** to save your generated diagram with any label repositioning for the Viewer. If you do not save your changes, the Viewer page will not display the updated diagram.
### Wellbore Diagram Viewer
When your diagram is successfully created, you will be redirected to the Wellbore Diagram Editor page of your new diagram.
From there, scroll down to view your generated diagram. You can now adjust label positions to improve readability and then use the buttons in the viewer's header to save or export your diagram.
To reposition labels:
1. Ensure Pan Mode is off (hand button in the header should be gray)
2. Click and drag any label text or table to a new position
3. Release to drop the label
Remember to click **Save Diagram** to save your generated diagram with any label repositioning for the Viewer. If you do not save your changes, the Viewer page will not display the updated diagram.
### Wellbore Diagram Viewer
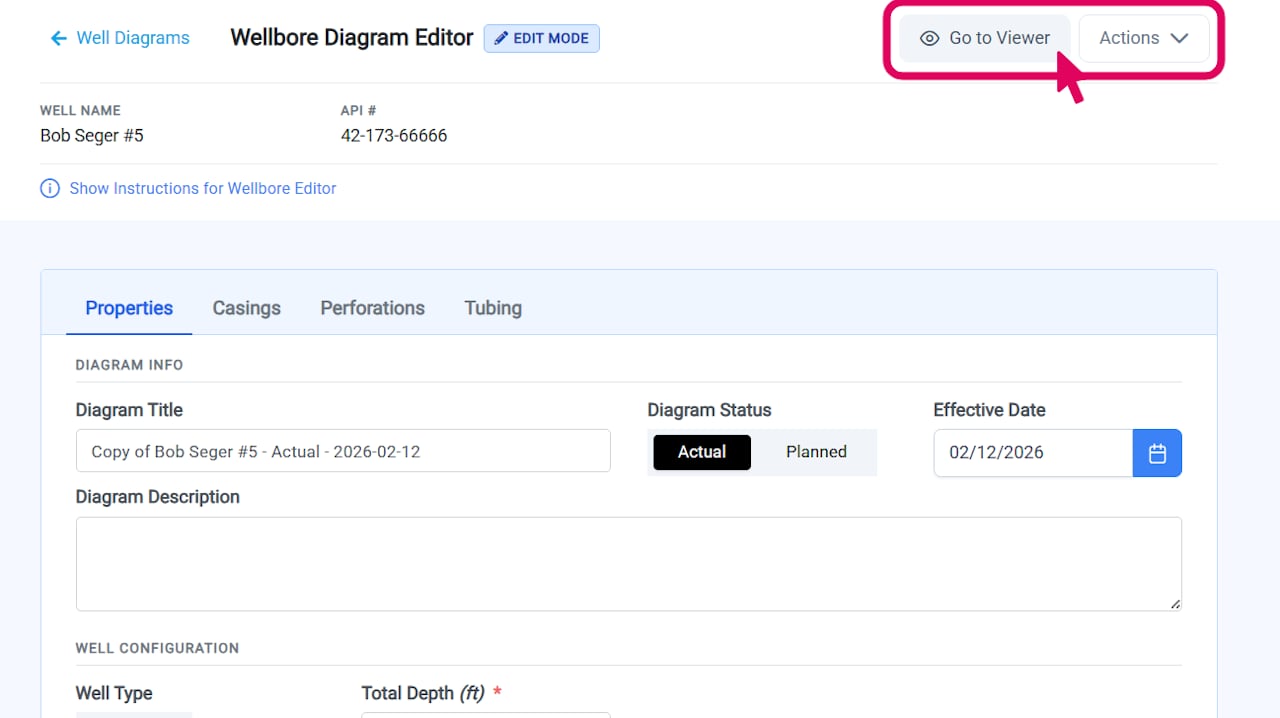 Once you are satisfied with your diagram and have saved it, click the **Go to Viewer** button at the top of the Wellbore Diagram Editor page to navigate to the Wellbore Diagram Viewer page.
Here you can view the diagram, export it, or review the data used to create it.
## Edit Wellbore Diagram
### Open the Wellbore Diagram Editor
Once you are satisfied with your diagram and have saved it, click the **Go to Viewer** button at the top of the Wellbore Diagram Editor page to navigate to the Wellbore Diagram Viewer page.
Here you can view the diagram, export it, or review the data used to create it.
## Edit Wellbore Diagram
### Open the Wellbore Diagram Editor
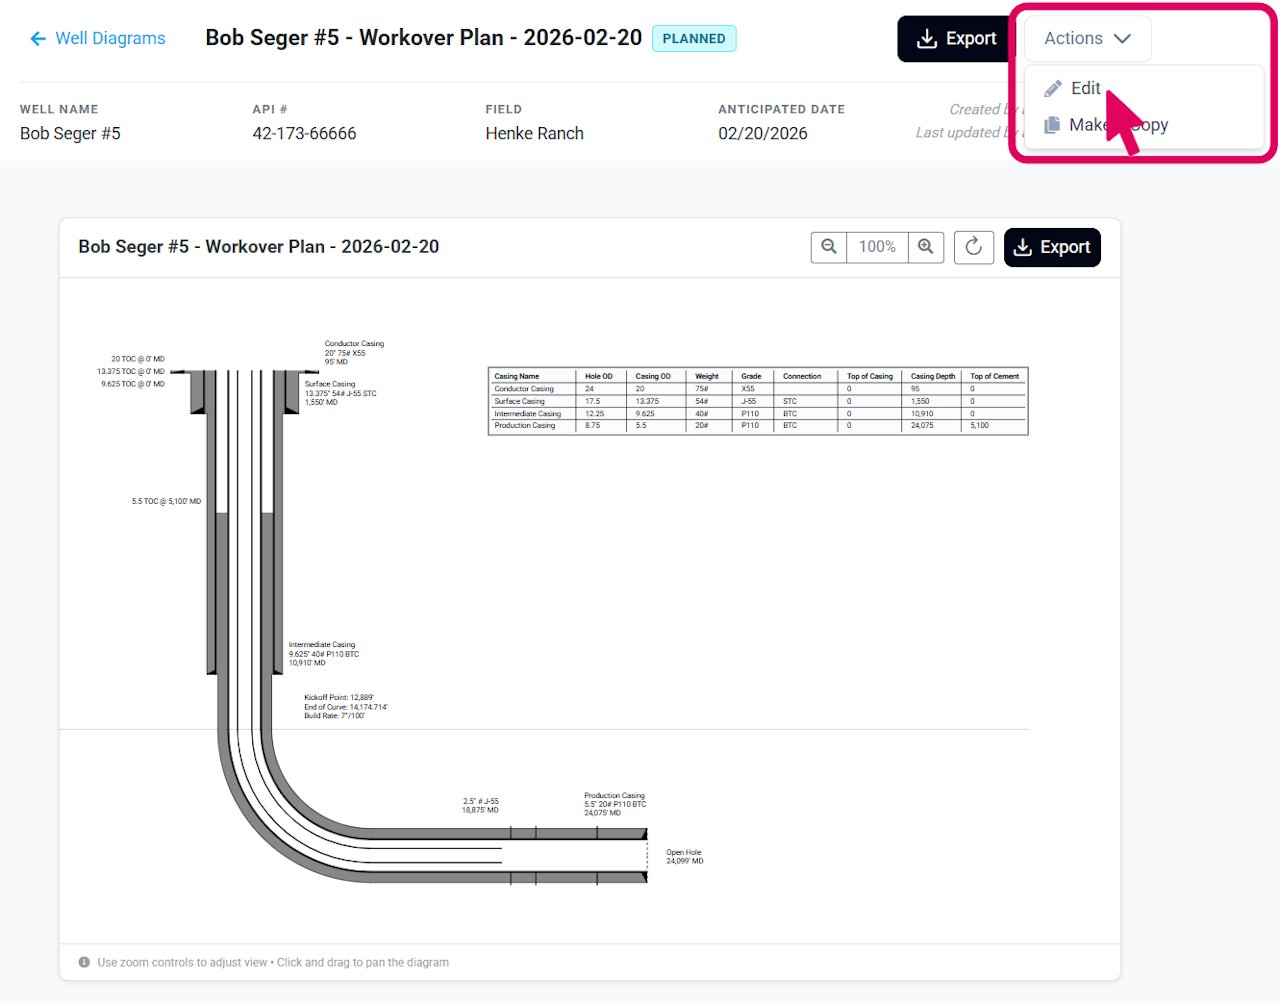 **From Wellbore Diagram View Page**
From the wellbore diagram view page, click the **Actions** button in the header of the page. Then, select **Edit** from the dropdown menu.
**From Wellbore Diagrams List**
On the well page, navigate to the wellbore diagram list. Then, locate the diagram you want to edit. Click the three-dot menu button of the diagram you want to edit and select **Edit Design** from the dropdown menu.
The editor will open and automatically load your saved diagram along with all design data and components.
### Edit Diagram Properties
**From Wellbore Diagram View Page**
From the wellbore diagram view page, click the **Actions** button in the header of the page. Then, select **Edit** from the dropdown menu.
**From Wellbore Diagrams List**
On the well page, navigate to the wellbore diagram list. Then, locate the diagram you want to edit. Click the three-dot menu button of the diagram you want to edit and select **Edit Design** from the dropdown menu.
The editor will open and automatically load your saved diagram along with all design data and components.
### Edit Diagram Properties
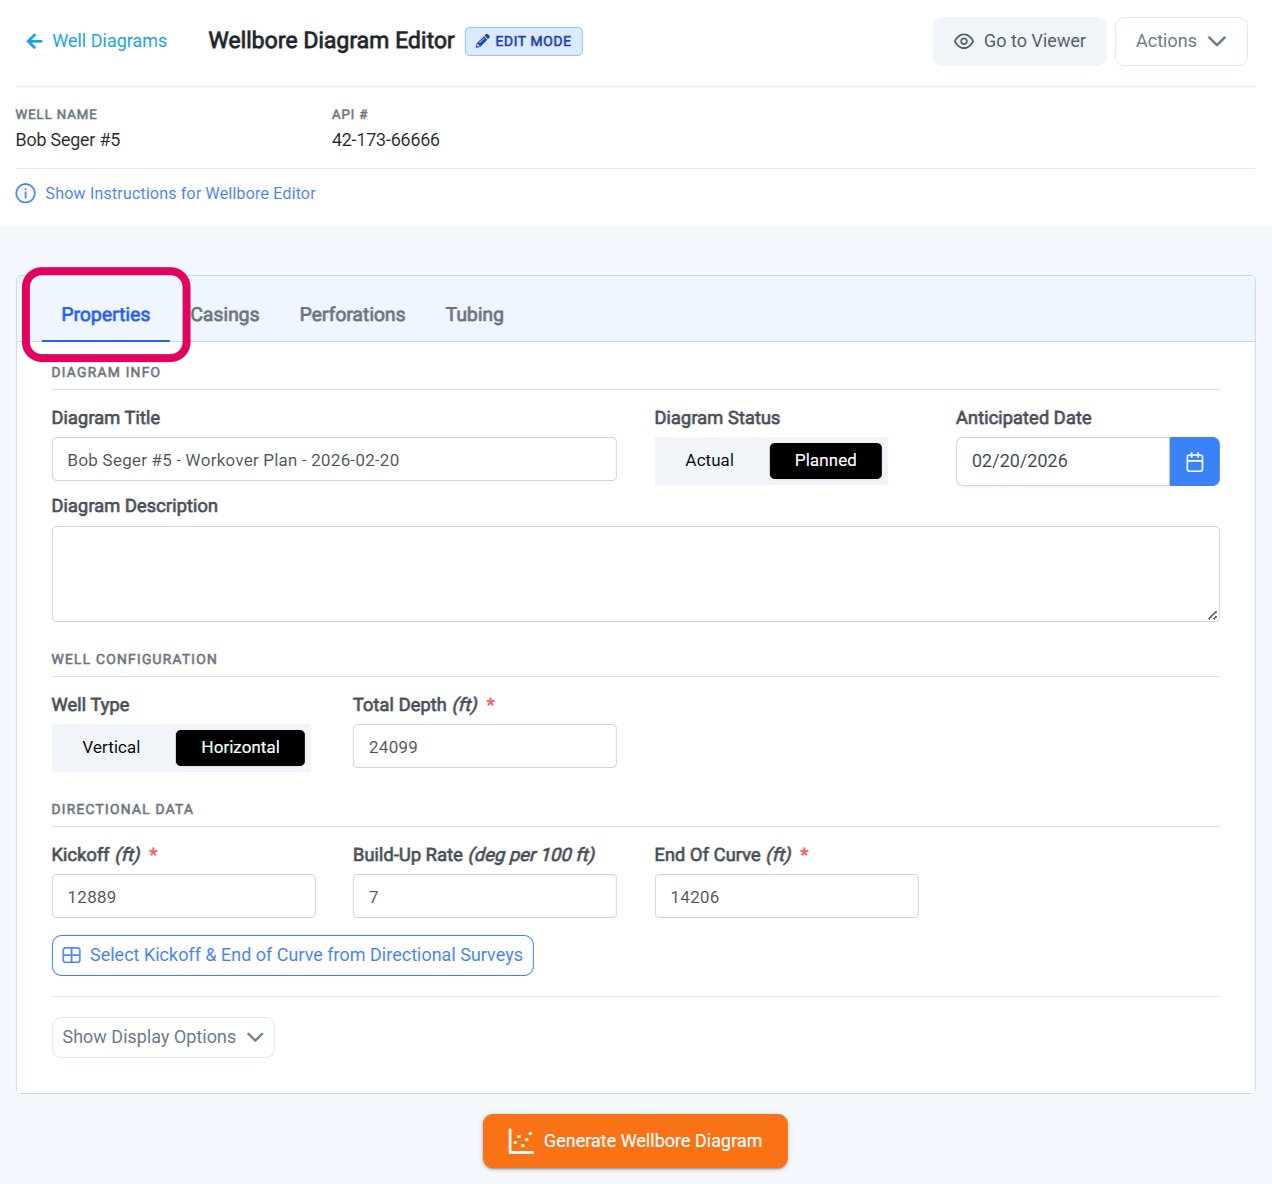 In the Properties section of the editor, you can update the core configuration of your wellbore diagram.
**Diagram Status**
Select the diagram status from the available options:
* **Actual** - This is used for actual (as drilled/completed) wellbore diagrams. You can note the date that the most recent changes were completed for the well.
* **Planned** - This is used for planned wellbore diagrams for future drilling or completion changes. You can note the anticipated date of the drilling or changes to the well.
**Date, Title, and Description**
Update the effective date, title, and description for your diagram as needed.
**Well Type and Total Depth**
Update the well type (Vertical or Horizontal) and total depth as needed.
### Horizontal Well Geometry
If your diagram's well type is Horizontal, an additional Horizontal Well Geometry section will appear where you can update the kickoff point and end of curve values.
If your well has directional surveys, click **Select Kickoff & End of Curve from Directional Surveys**. A table will display all directional surveys for the well. Review the survey data and click **Select** on the row that represents your kickoff point. Repeat this process for the end of curve survey. Build rate is calculated automatically when you click **Apply Selections**.
If your well does not have directional surveys, you can enter the measured depth and inclination for the kickoff point and end of curve manually. Build rate is calculated automatically from your values. To switch from survey selection to manual entry, click **Input Values Manually**.
### Edit Casings
In the Properties section of the editor, you can update the core configuration of your wellbore diagram.
**Diagram Status**
Select the diagram status from the available options:
* **Actual** - This is used for actual (as drilled/completed) wellbore diagrams. You can note the date that the most recent changes were completed for the well.
* **Planned** - This is used for planned wellbore diagrams for future drilling or completion changes. You can note the anticipated date of the drilling or changes to the well.
**Date, Title, and Description**
Update the effective date, title, and description for your diagram as needed.
**Well Type and Total Depth**
Update the well type (Vertical or Horizontal) and total depth as needed.
### Horizontal Well Geometry
If your diagram's well type is Horizontal, an additional Horizontal Well Geometry section will appear where you can update the kickoff point and end of curve values.
If your well has directional surveys, click **Select Kickoff & End of Curve from Directional Surveys**. A table will display all directional surveys for the well. Review the survey data and click **Select** on the row that represents your kickoff point. Repeat this process for the end of curve survey. Build rate is calculated automatically when you click **Apply Selections**.
If your well does not have directional surveys, you can enter the measured depth and inclination for the kickoff point and end of curve manually. Build rate is calculated automatically from your values. To switch from survey selection to manual entry, click **Input Values Manually**.
### Edit Casings
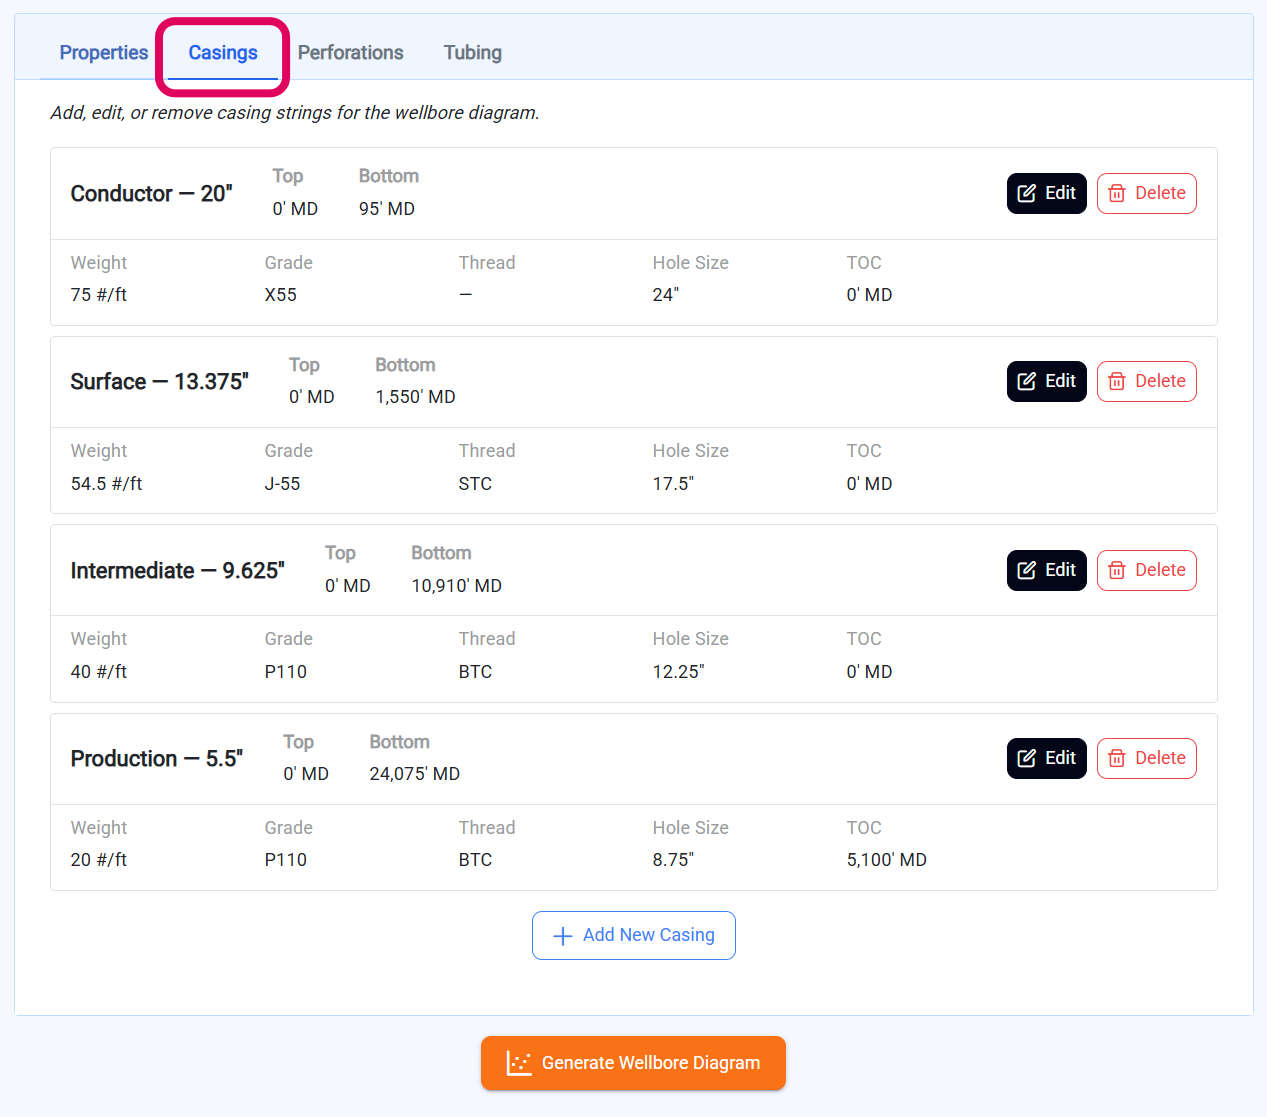 In the Casings section of the editor, you can add, edit, and delete the casing strings for your wellbore diagram. Click **Add** to add a new casing string. Click **Edit** next to an existing casing to modify it, then click **Update Casing String** to save your changes. Click **Delete** to remove a casing string.
It is recommended to fill in the **Hole Size** field for each casing string to ensure accurate diagram generation.
### Edit Perforations
In the Casings section of the editor, you can add, edit, and delete the casing strings for your wellbore diagram. Click **Add** to add a new casing string. Click **Edit** next to an existing casing to modify it, then click **Update Casing String** to save your changes. Click **Delete** to remove a casing string.
It is recommended to fill in the **Hole Size** field for each casing string to ensure accurate diagram generation.
### Edit Perforations
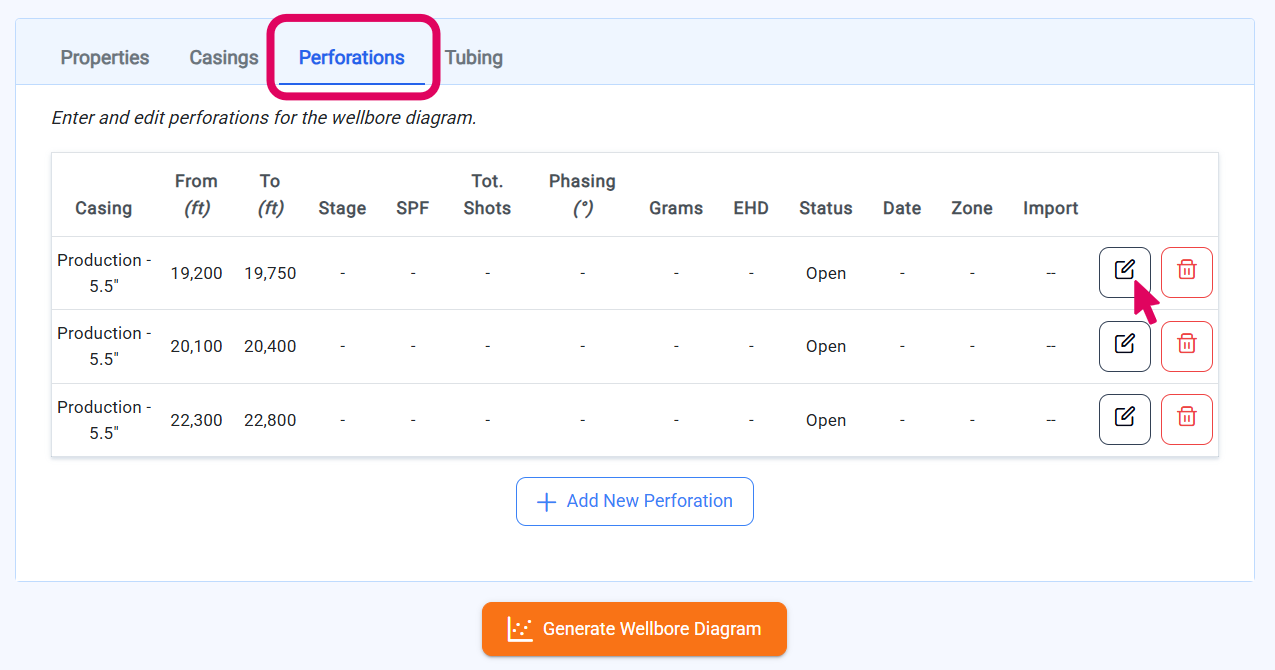 In the Perforations section of the editor, you can add, edit, and delete the perforation intervals for your wellbore diagram. Each perforation must be associated with a casing string — select the appropriate casing from the dropdown when adding or editing a perforation.
### Edit Tubing
In the Perforations section of the editor, you can add, edit, and delete the perforation intervals for your wellbore diagram. Each perforation must be associated with a casing string — select the appropriate casing from the dropdown when adding or editing a perforation.
### Edit Tubing
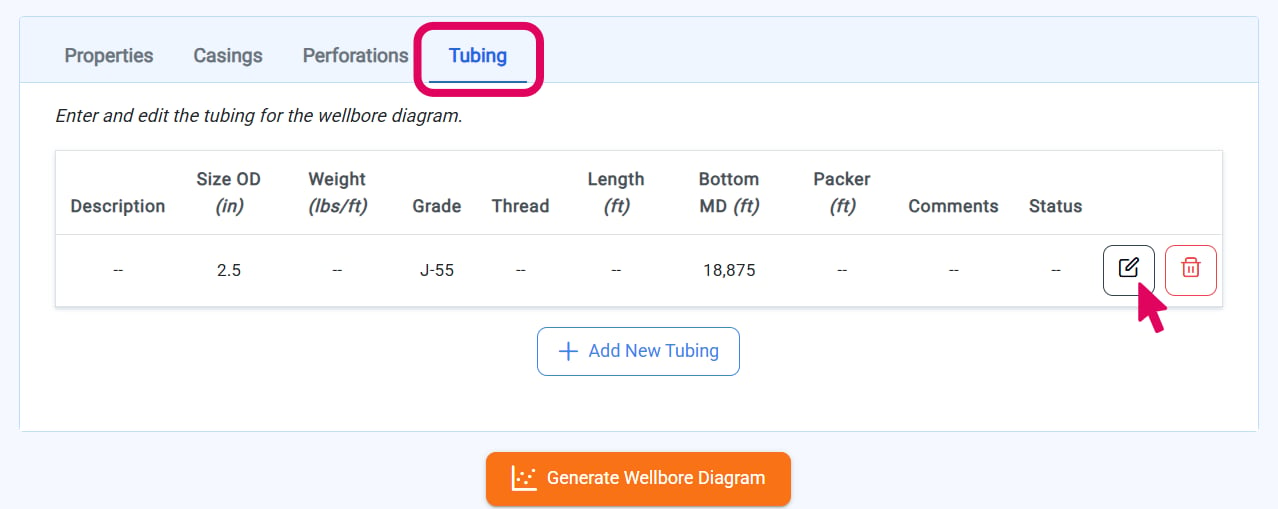 In the Tubing section of the editor, you can add, edit, and delete the tubing strings for your wellbore diagram. Click **Add** to add a new tubing string. Click **Edit** next to an existing tubing string to modify it, then click **Update Tubing String** to save your changes. Click **Delete** to remove a tubing string.
### Generate Wellbore Diagram
In the Tubing section of the editor, you can add, edit, and delete the tubing strings for your wellbore diagram. Click **Add** to add a new tubing string. Click **Edit** next to an existing tubing string to modify it, then click **Update Tubing String** to save your changes. Click **Delete** to remove a tubing string.
### Generate Wellbore Diagram
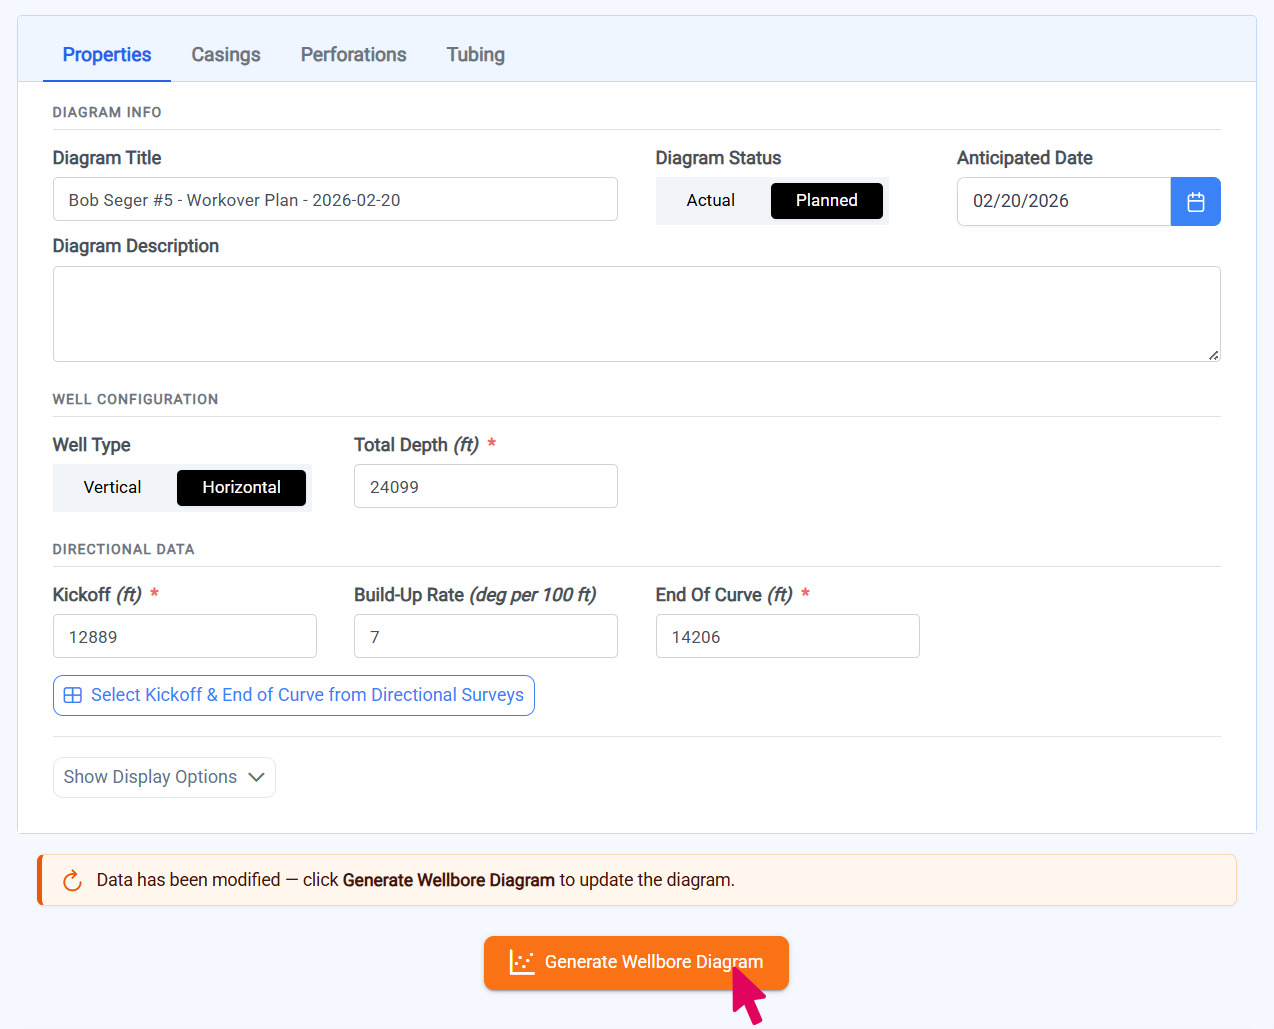 After making all of your changes to the diagram's properties, casings, perforations, and tubing, click the **Generate Wellbore Diagram** button to regenerate the visual diagram with your updated data.
**Note:** Generating the diagram will reset any label positions you have previously set. If you have repositioned labels, you will need to reposition them again after generating.
### Preview and Reposition in Diagram Viewer
After making all of your changes to the diagram's properties, casings, perforations, and tubing, click the **Generate Wellbore Diagram** button to regenerate the visual diagram with your updated data.
**Note:** Generating the diagram will reset any label positions you have previously set. If you have repositioned labels, you will need to reposition them again after generating.
### Preview and Reposition in Diagram Viewer
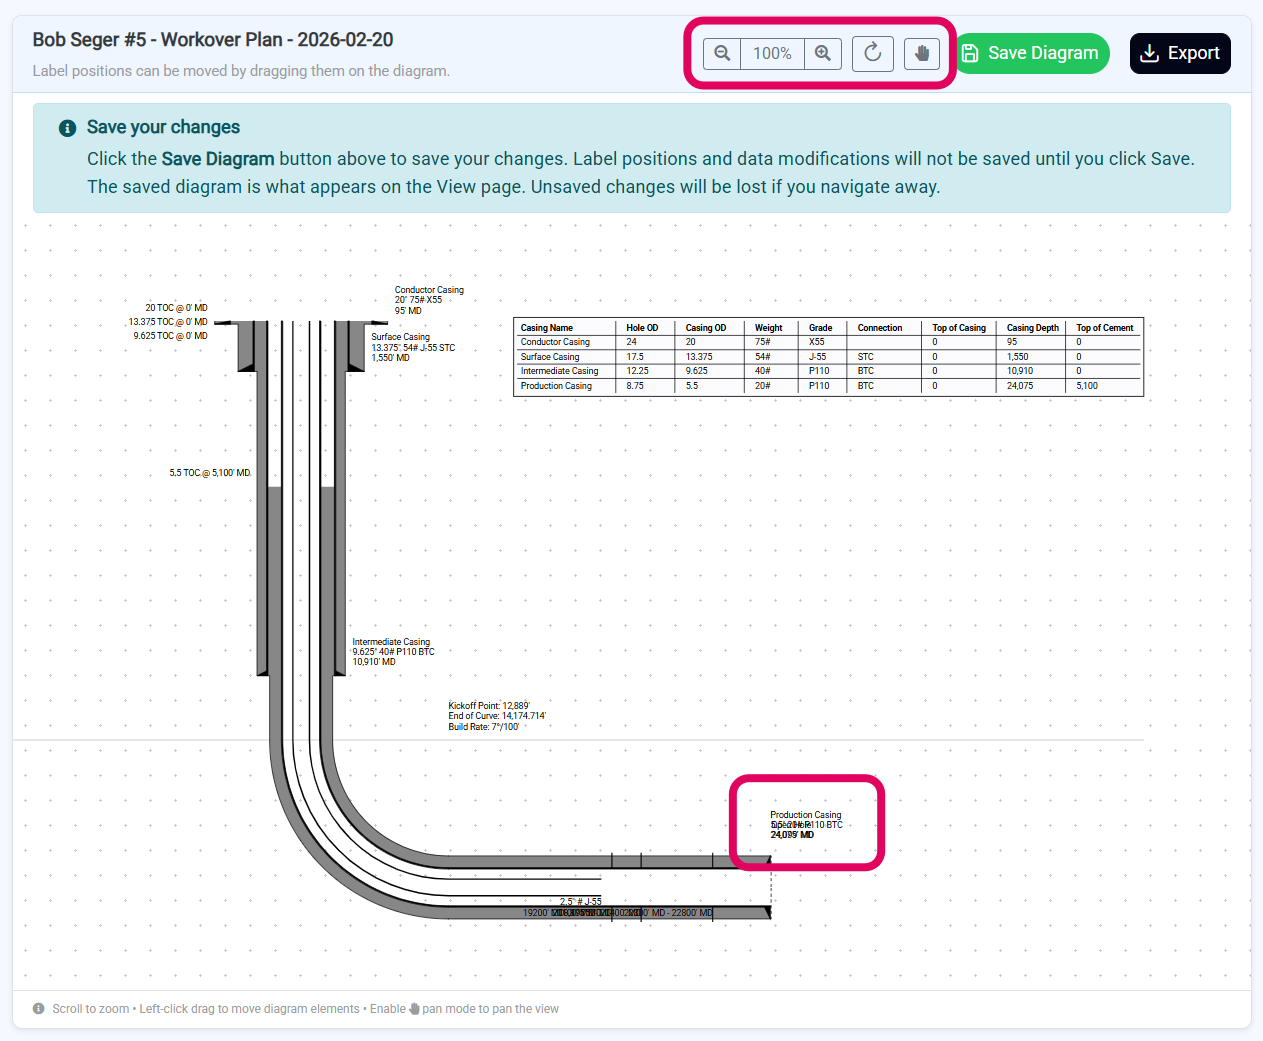 After generating, scroll down to preview the diagram in the viewer panel embedded in the editor. Use the Zoom and Fit to Window controls in the header to adjust the view. Click the hand button to toggle between Pan mode (blue) and Edit mode (gray).
To reposition labels:
1. Ensure Pan Mode is off (hand button should be gray)
2. Click and drag any label text or table to a new position
3. Release to drop the label
### Save and Export Diagram
After generating, scroll down to preview the diagram in the viewer panel embedded in the editor. Use the Zoom and Fit to Window controls in the header to adjust the view. Click the hand button to toggle between Pan mode (blue) and Edit mode (gray).
To reposition labels:
1. Ensure Pan Mode is off (hand button should be gray)
2. Click and drag any label text or table to a new position
3. Release to drop the label
### Save and Export Diagram
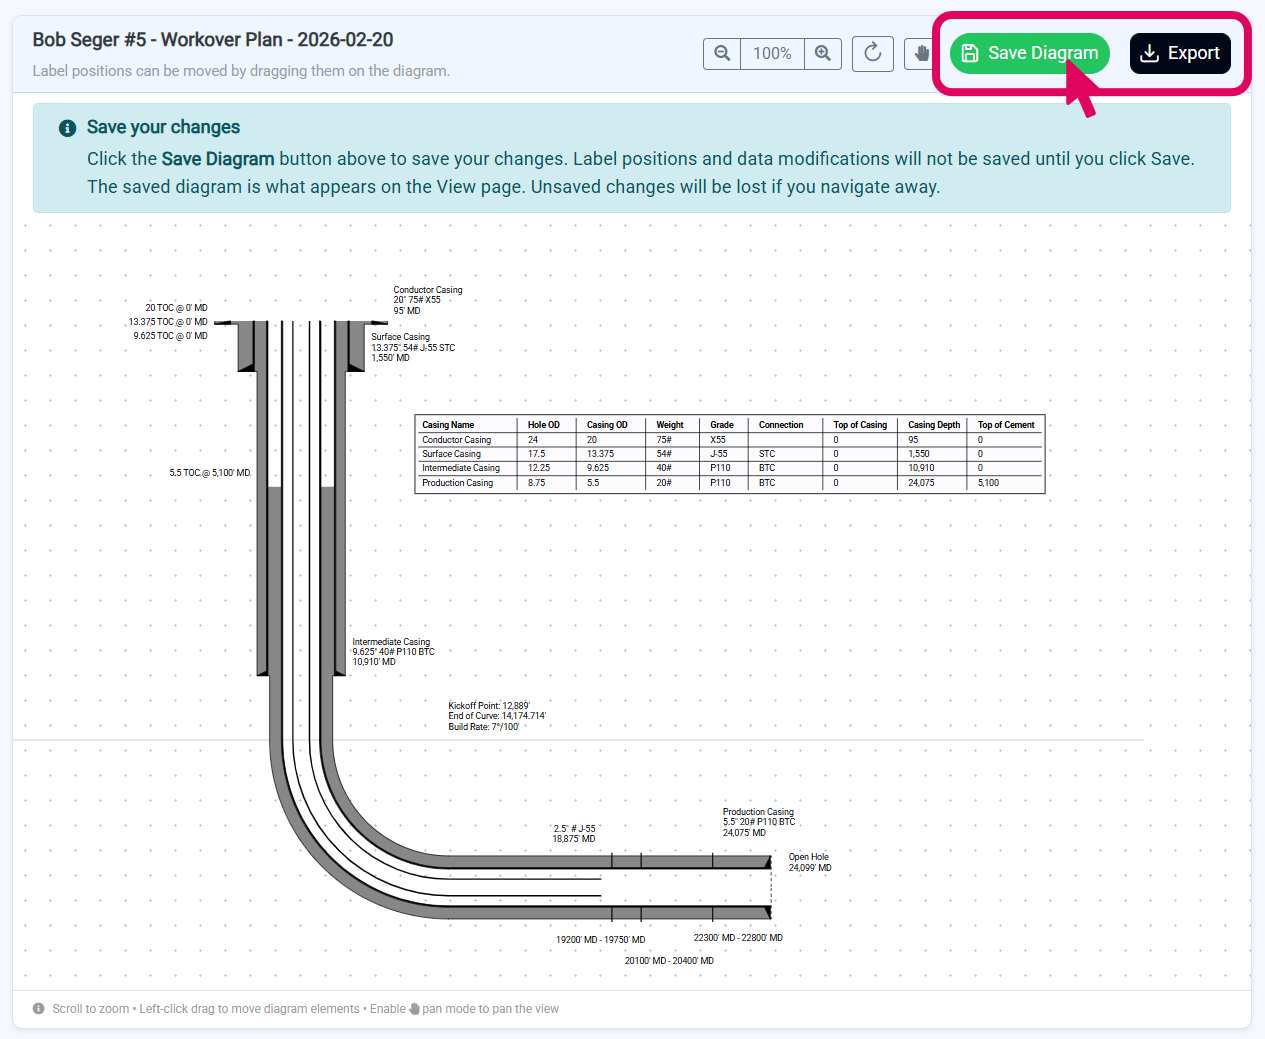 Click **Save Diagram** to save your generated diagram along with any label repositioning. If a saved version already exists, you will be prompted to confirm that you want to overwrite it.
Click **Export** to open the export options. Select your desired format from the **Format** dropdown. For PDF exports, additional options for **Orientation** and **Included in the Header** will appear. Click **Export** to download your diagram.
## View Wellbore Diagram
### Navigate to Wellbore Diagram List
Click **Save Diagram** to save your generated diagram along with any label repositioning. If a saved version already exists, you will be prompted to confirm that you want to overwrite it.
Click **Export** to open the export options. Select your desired format from the **Format** dropdown. For PDF exports, additional options for **Orientation** and **Included in the Header** will appear. Click **Export** to download your diagram.
## View Wellbore Diagram
### Navigate to Wellbore Diagram List
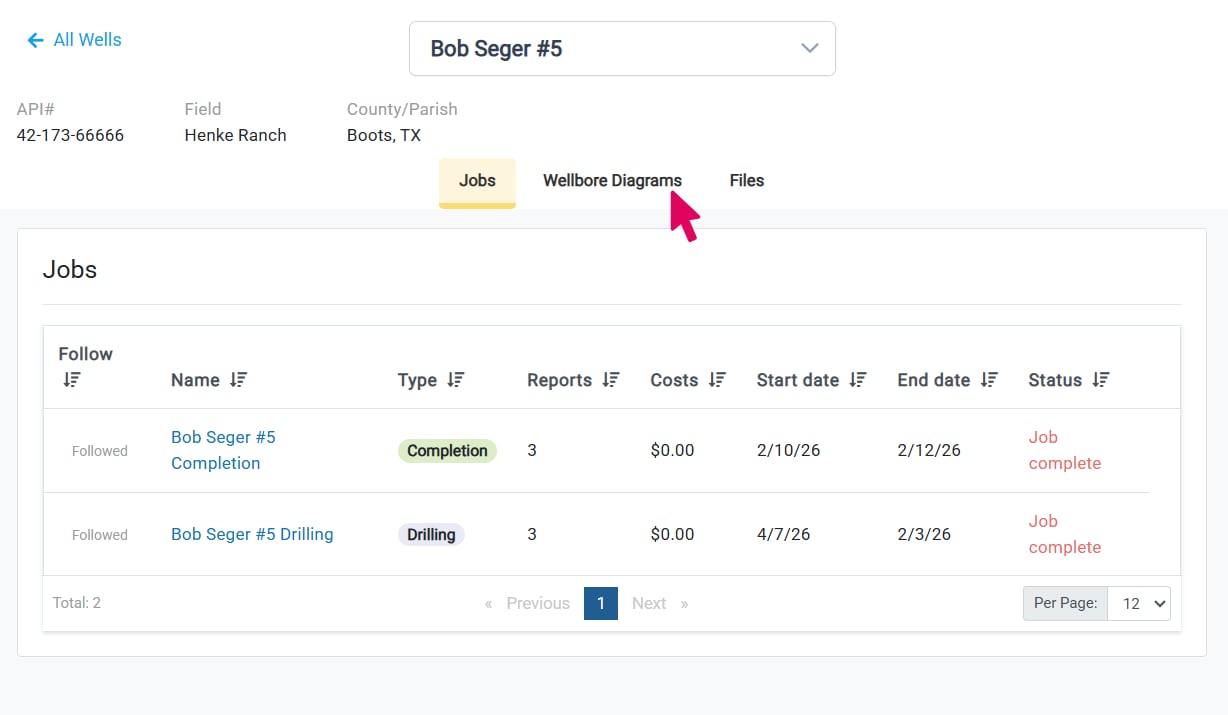 Start by navigating to the well overview page. Once there, click the **Wellbore Diagrams** header to view the diagrams for this well.
Here, you can view all of the wellbore diagrams for this well. The most recent diagram is displayed at the top. If you want to view an older diagram, scroll down to **Other Diagrams** where all diagrams for that well are listed.
The **Other Diagrams** section can be sorted by diagram type. Just select **All**, **Actual**, or **Planned** to see diagrams of that type.
### Select a Diagram
Start by navigating to the well overview page. Once there, click the **Wellbore Diagrams** header to view the diagrams for this well.
Here, you can view all of the wellbore diagrams for this well. The most recent diagram is displayed at the top. If you want to view an older diagram, scroll down to **Other Diagrams** where all diagrams for that well are listed.
The **Other Diagrams** section can be sorted by diagram type. Just select **All**, **Actual**, or **Planned** to see diagrams of that type.
### Select a Diagram
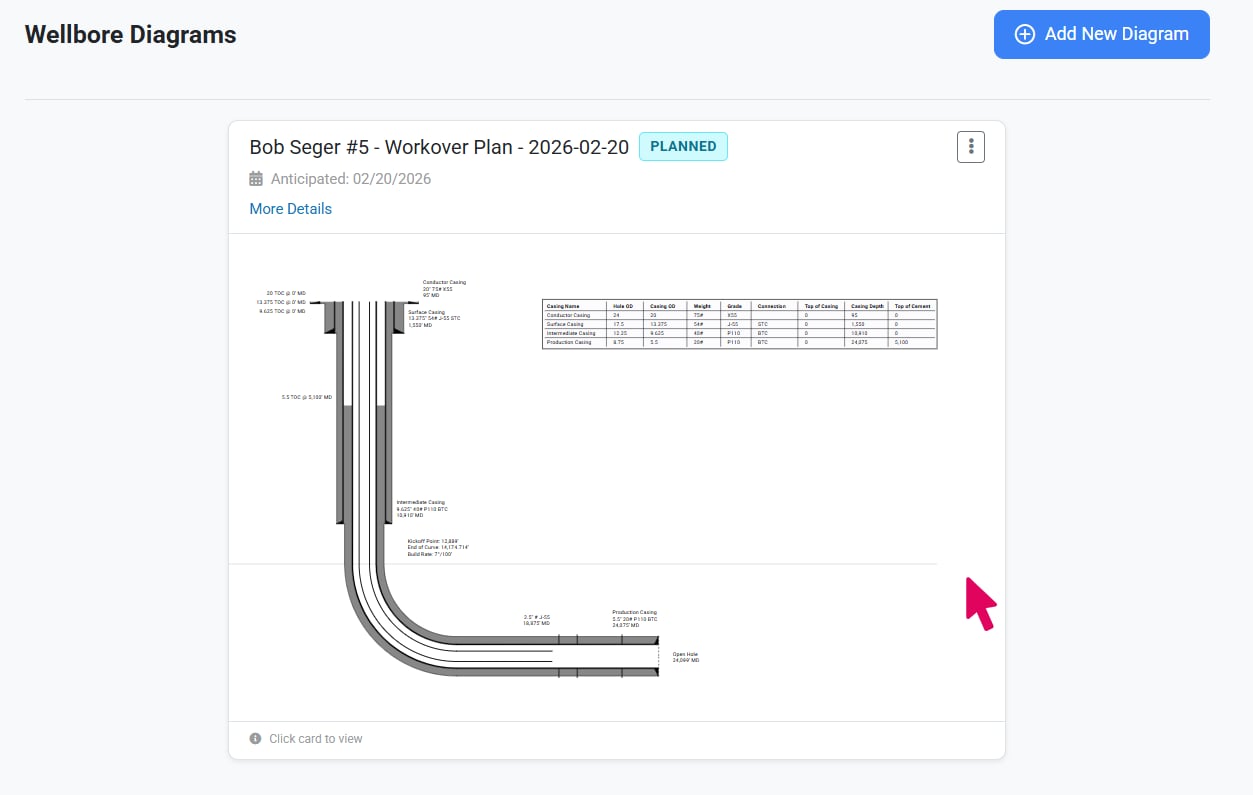 Click on a diagram card to open it in the Wellbore Diagram Viewer. The most recent diagram can be opened directly from the top of the Wellbore Diagrams tab. For older diagrams, scroll down to the **Other Diagrams** section and click on the diagram you want to view.
### Use the Wellbore Diagram Viewer
Click on a diagram card to open it in the Wellbore Diagram Viewer. The most recent diagram can be opened directly from the top of the Wellbore Diagrams tab. For older diagrams, scroll down to the **Other Diagrams** section and click on the diagram you want to view.
### Use the Wellbore Diagram Viewer
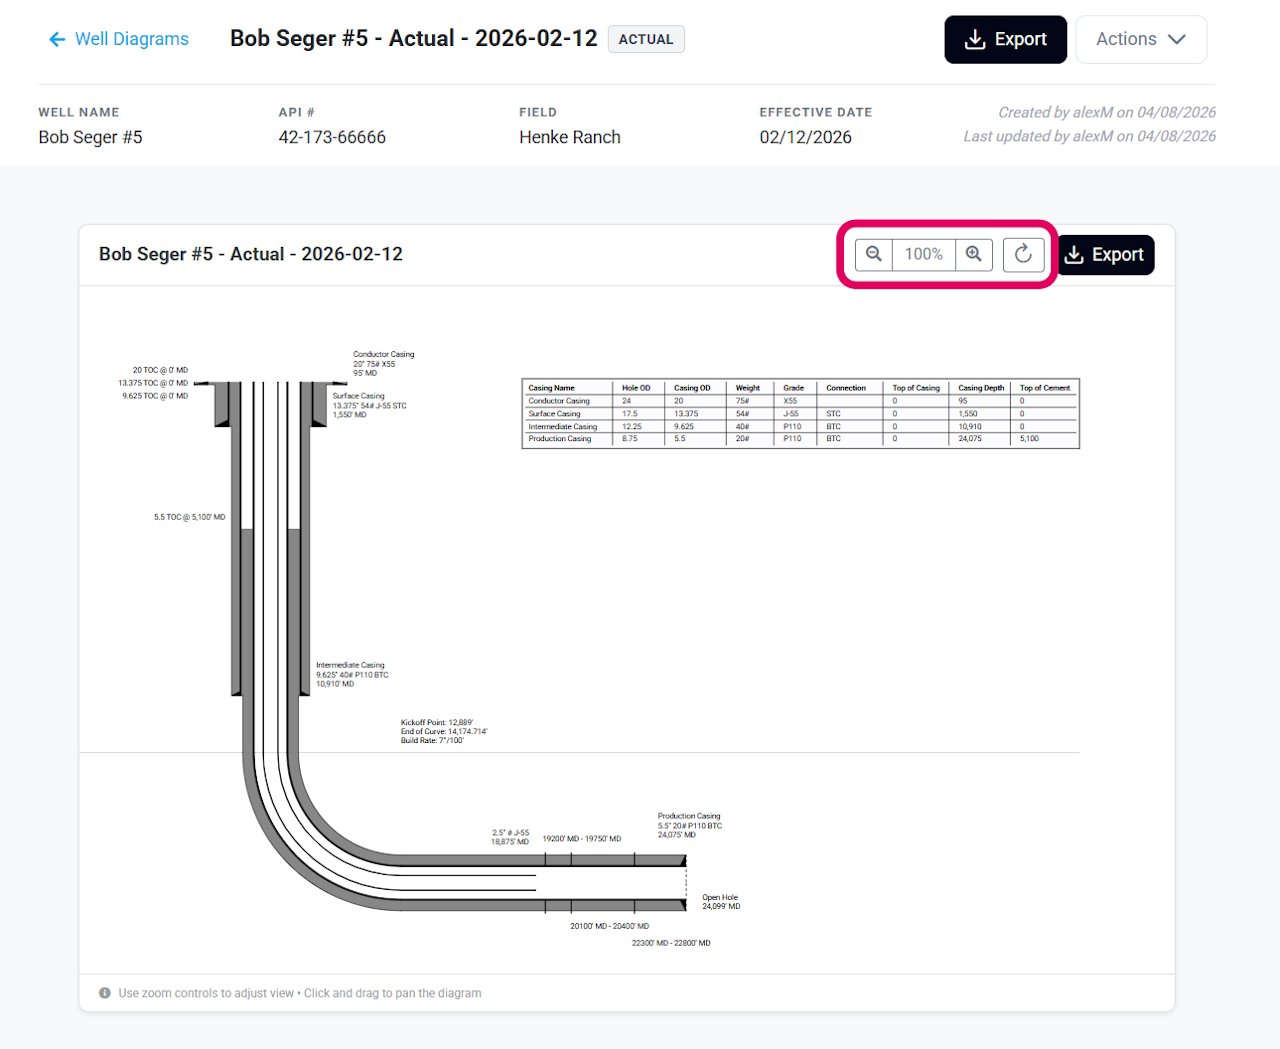 The Wellbore Diagram Viewer displays your saved diagram and provides controls for navigating and exporting it. Use the **Zoom** buttons to adjust the scale, click **Fit to Window** to auto-scale the diagram, and click and drag to pan around the diagram (pan mode is always active in the viewer).
### Review Design Specifications
The Wellbore Diagram Viewer displays your saved diagram and provides controls for navigating and exporting it. Use the **Zoom** buttons to adjust the scale, click **Fit to Window** to auto-scale the diagram, and click and drag to pan around the diagram (pan mode is always active in the viewer).
### Review Design Specifications
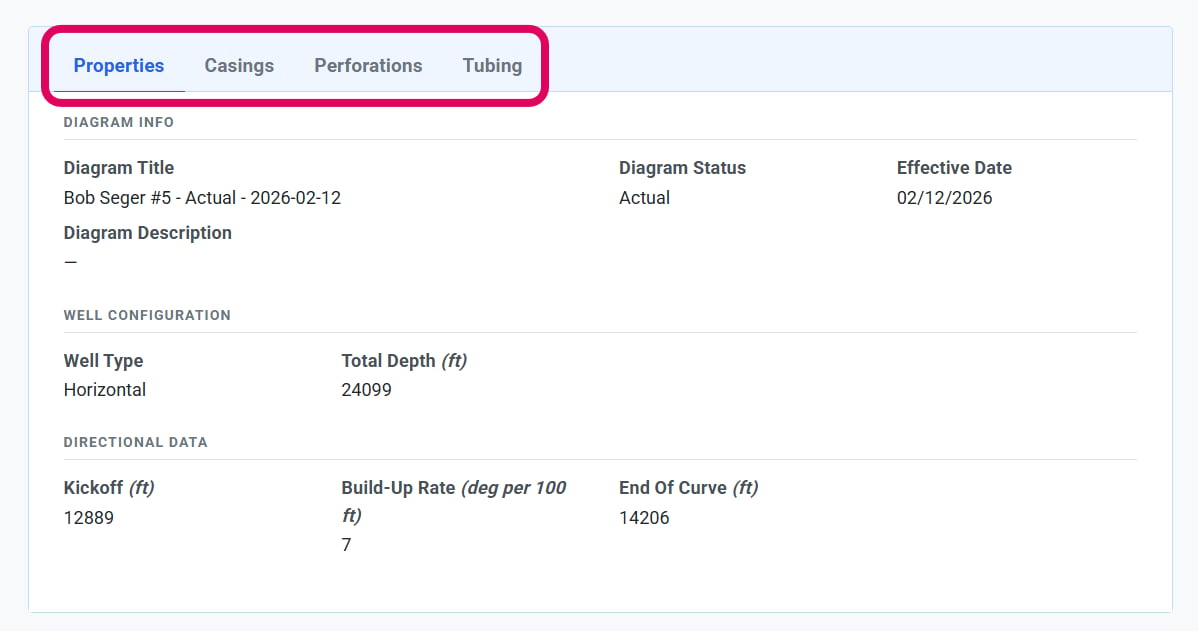 Below the diagram, the design specifications are organized into four tabs: **Properties**, **Casings**, **Perforations**, and **Tubing**. Each tab displays the data that was used to generate the diagram.
### Export Diagram
Below the diagram, the design specifications are organized into four tabs: **Properties**, **Casings**, **Perforations**, and **Tubing**. Each tab displays the data that was used to generate the diagram.
### Export Diagram
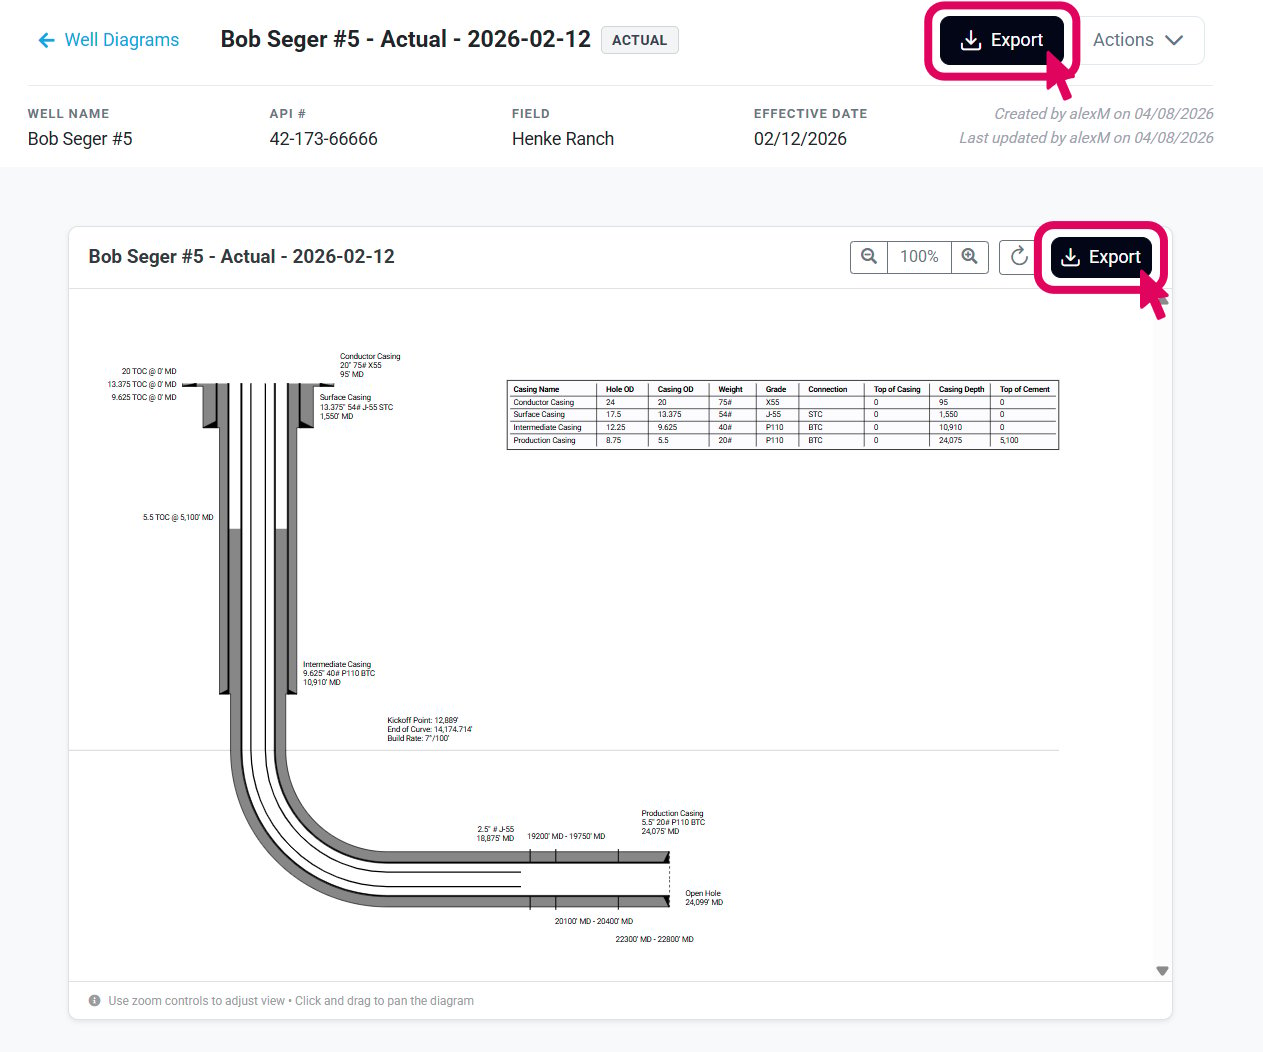 Click **Export** to open the export options. Select your desired format from the **Format** dropdown. For PDF exports, additional options for **Orientation** and **Included in the Header** will appear. Click **Export** to download your diagram.
## Copy Wellbore Diagram
### Open the Copy Wellbore Diagram Window
Click **Export** to open the export options. Select your desired format from the **Format** dropdown. For PDF exports, additional options for **Orientation** and **Included in the Header** will appear. Click **Export** to download your diagram.
## Copy Wellbore Diagram
### Open the Copy Wellbore Diagram Window
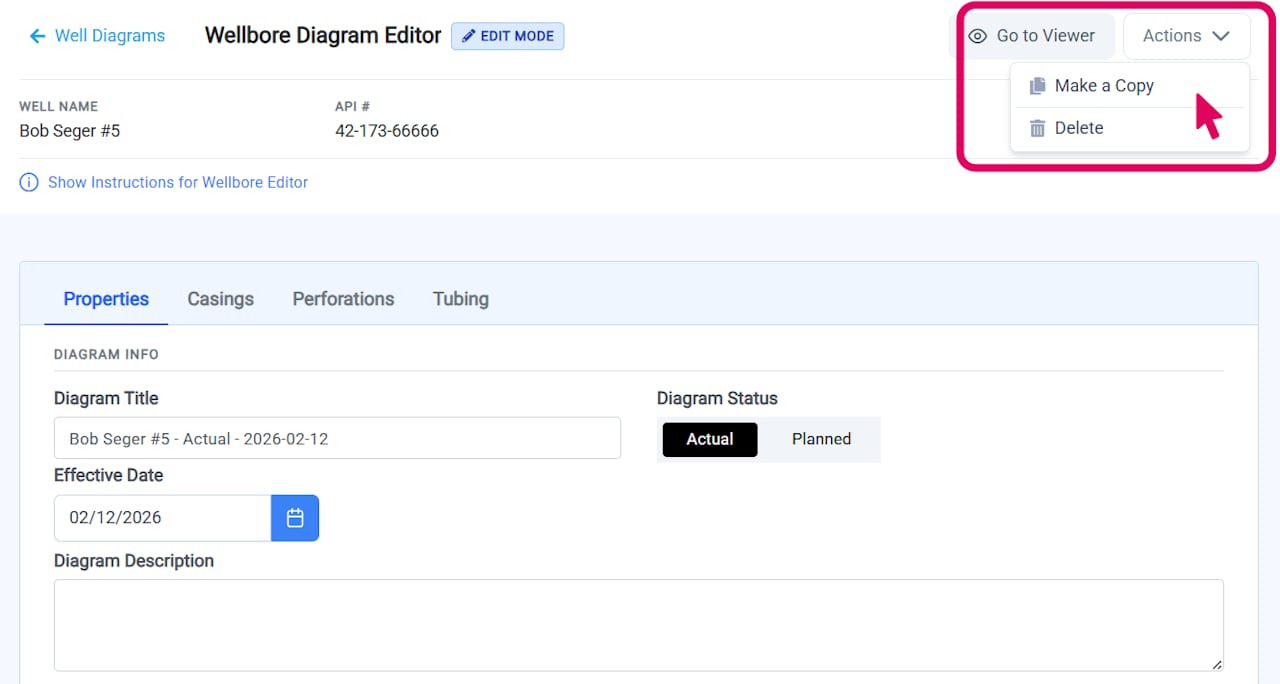 To create a copy of an existing wellbore diagram, locate the diagram you want to duplicate. You can access the copy function from three locations:
* **From the list page** - Click the three-dot menu button in the bottom right corner of any diagram card and select **Make a Copy**.
* **From the editor** - Click the three-dot menu button at the top of the editor and select **Make a Copy**.
* **From the viewer** - Click the three-dot menu button at the top of the viewer and select **Make a Copy**.
The copy modal will open, displaying information about the source diagram.
### Review and Customize
To create a copy of an existing wellbore diagram, locate the diagram you want to duplicate. You can access the copy function from three locations:
* **From the list page** - Click the three-dot menu button in the bottom right corner of any diagram card and select **Make a Copy**.
* **From the editor** - Click the three-dot menu button at the top of the editor and select **Make a Copy**.
* **From the viewer** - Click the three-dot menu button at the top of the viewer and select **Make a Copy**.
The copy modal will open, displaying information about the source diagram.
### Review and Customize
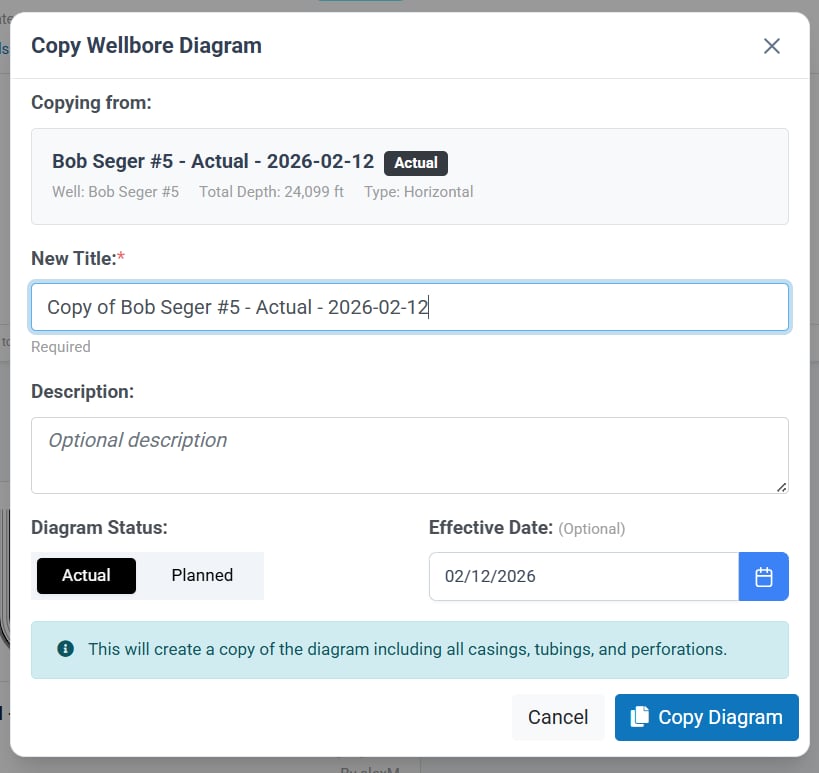 **Review Source Diagram**
The copy diagram window displays information about the diagram you're copying to confirm you've selected the correct source: original diagram title, description, well name, API number, creation date and creator.
**Customize**
The new diagram's fields are pre-filled with data from the source diagram. You can update the new diagram's title, description, diagram type and date before creating the copy.
The copy operation duplicates all diagram data: design configuration, casings, perforations, and tubing.
### Create the Copy
**Review Source Diagram**
The copy diagram window displays information about the diagram you're copying to confirm you've selected the correct source: original diagram title, description, well name, API number, creation date and creator.
**Customize**
The new diagram's fields are pre-filled with data from the source diagram. You can update the new diagram's title, description, diagram type and date before creating the copy.
The copy operation duplicates all diagram data: design configuration, casings, perforations, and tubing.
### Create the Copy
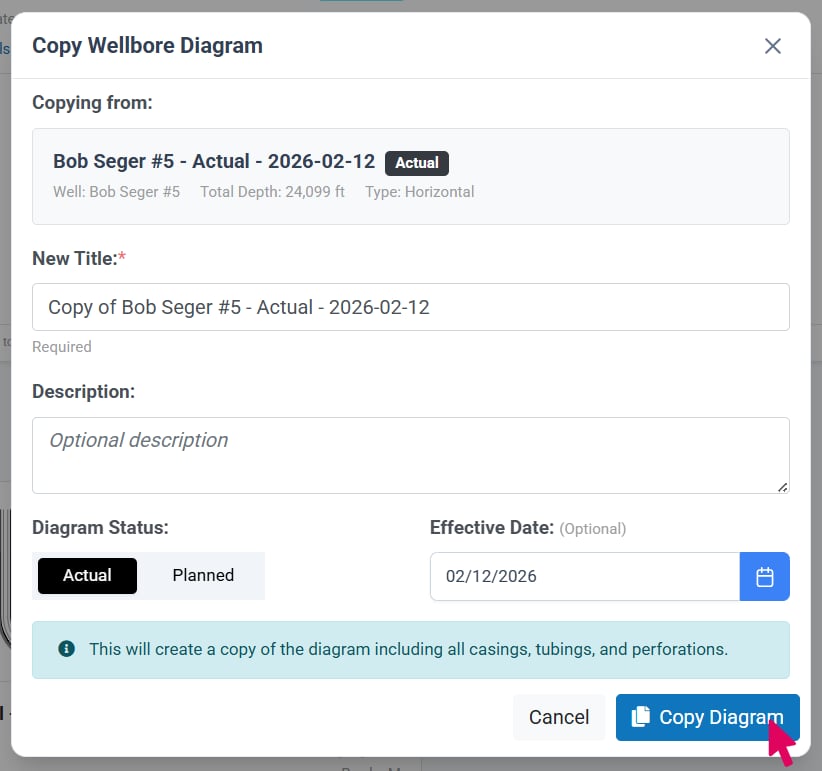 After customizing your new diagram's details, review all fields to ensure everything is correct. When ready, click **Copy Diagram** at the bottom of the modal.
Once the copy is made, you will be automatically navigated to the editor for your new diagram.
After customizing your new diagram's details, review all fields to ensure everything is correct. When ready, click **Copy Diagram** at the bottom of the modal.
Once the copy is made, you will be automatically navigated to the editor for your new diagram.