> ## Documentation Index
> Fetch the complete documentation index at: https://docs.rigreports.com/llms.txt
> Use this file to discover all available pages before exploring further.
# Create a New Job
## Select Start a New Job
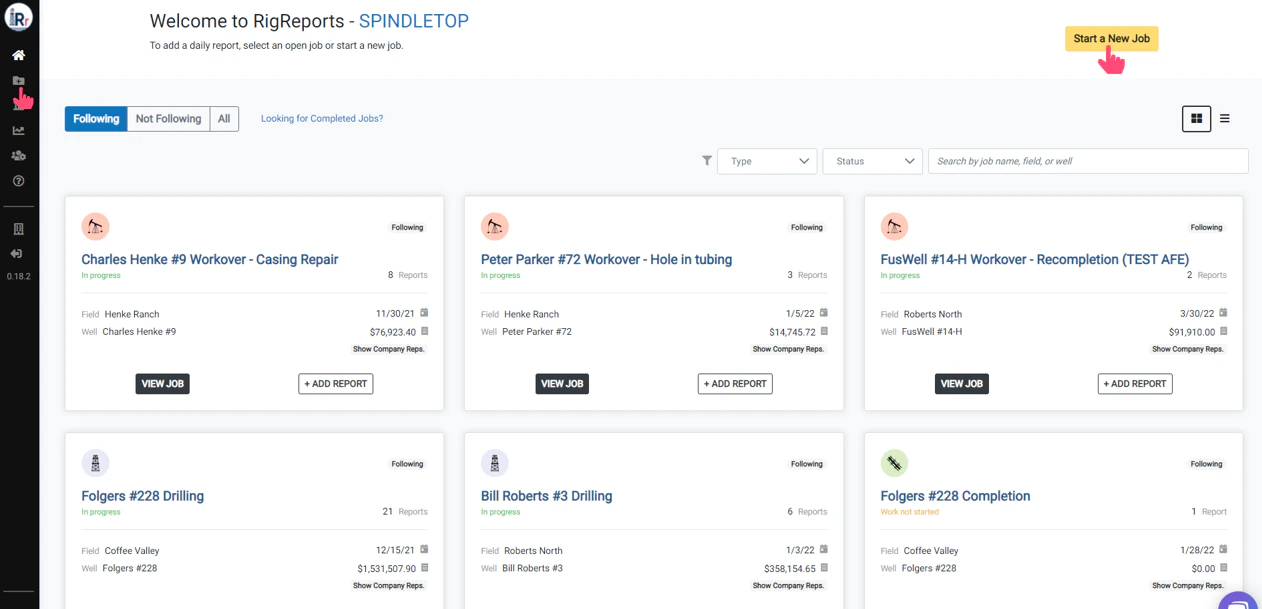
To get started creating a job, select **Start A New Job** from the Homepage or the expandable side menu.
 ## Select the Job Type
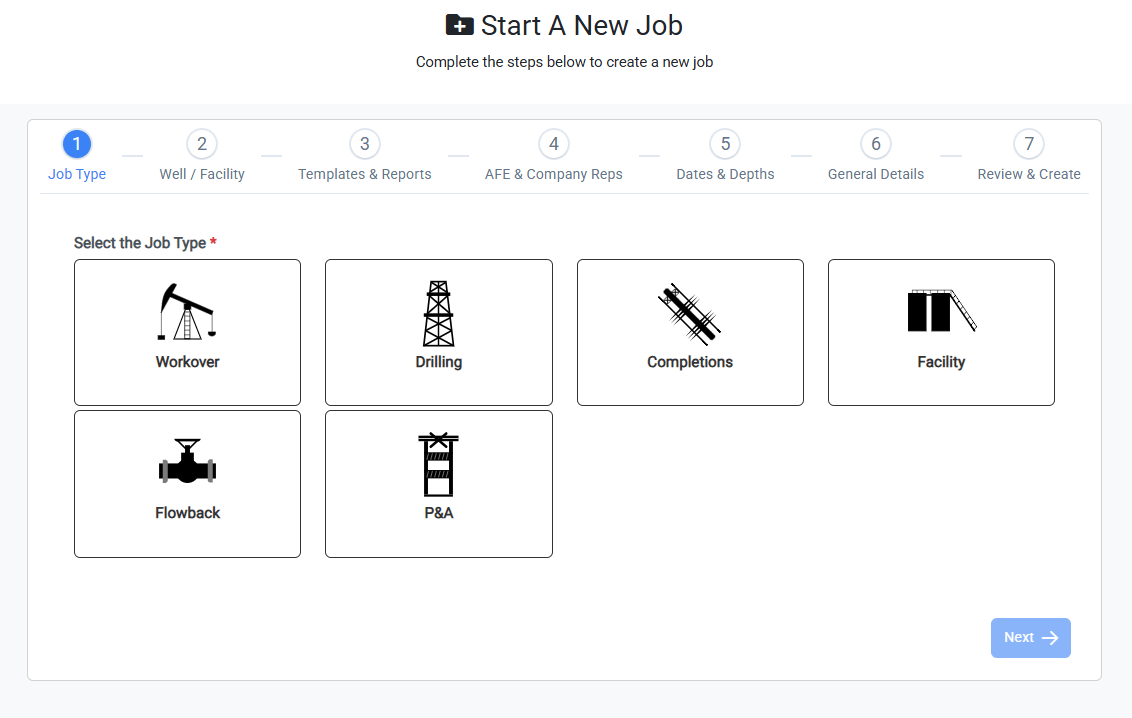
Click on the box for the type of job you will be performing. The options for the next steps will change based on the job type selected.
The job type, field, well, cost template, and cost contingency factor cannot be changed after the job has been created. All other options can be updated at any point during the job.
## Select the Job Type
Click on the box for the type of job you will be performing. The options for the next steps will change based on the job type selected.
The job type, field, well, cost template, and cost contingency factor cannot be changed after the job has been created. All other options can be updated at any point during the job.
 ## Select the Well or Facility
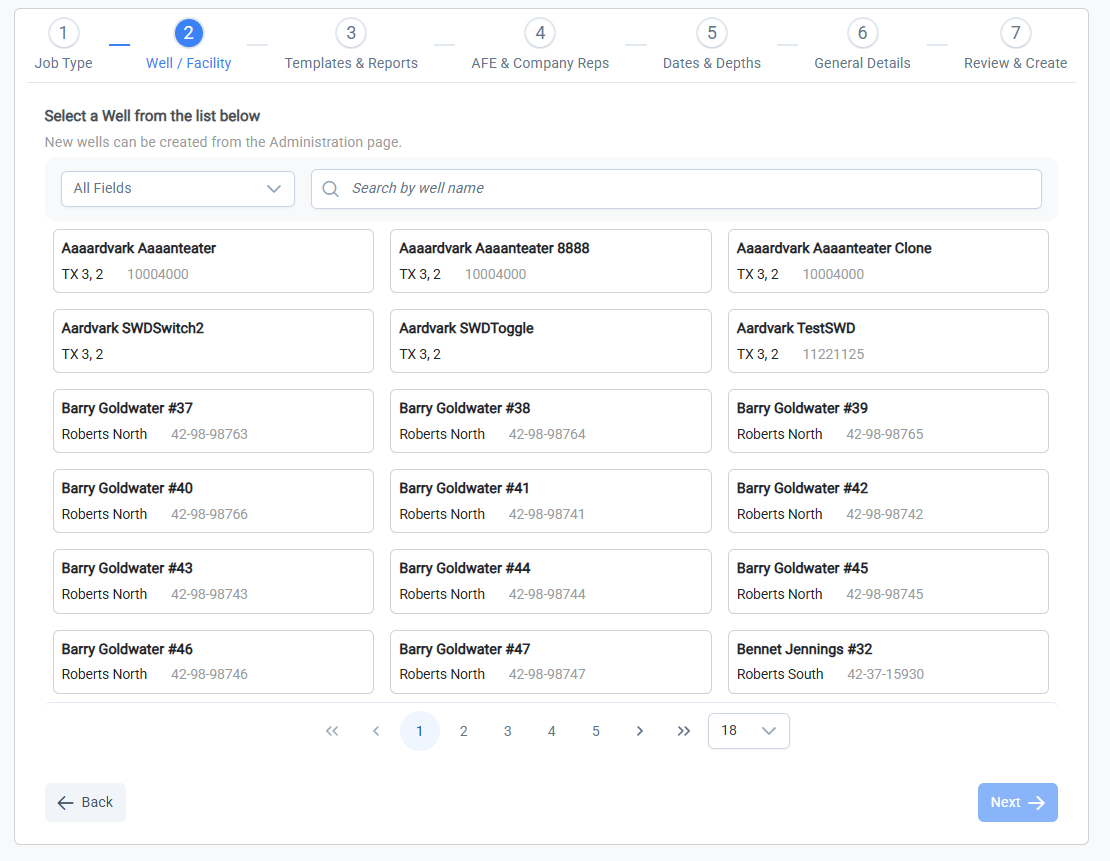
Once the job type has been selected, the next step is to select the well or facility where the work will be performed. Wells/facilities can be searched by name by typing in the search bar. You can also use the dropdown to filter the list by field.
New wells or facilities can be created by Administrators from the Admin -> Wells page
## Select the Well or Facility
Once the job type has been selected, the next step is to select the well or facility where the work will be performed. Wells/facilities can be searched by name by typing in the search bar. You can also use the dropdown to filter the list by field.
New wells or facilities can be created by Administrators from the Admin -> Wells page
 ## Select the Cost Template, Report Layout and Approval Requirements
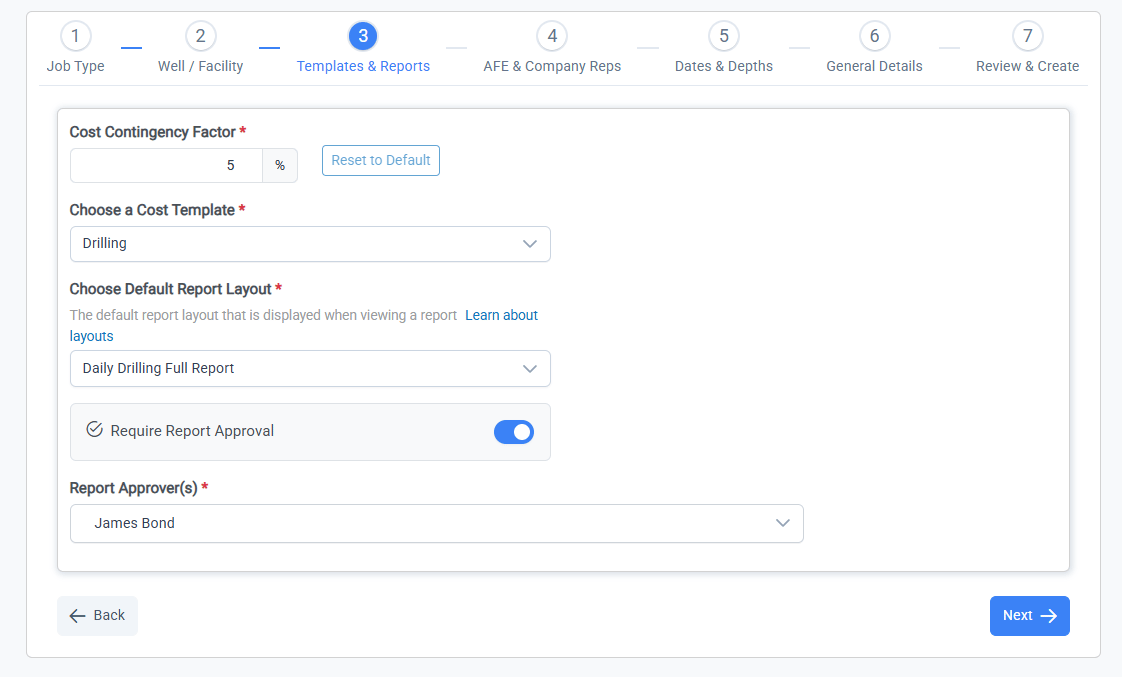
Once the well or facility has been selected, the next step is to set the cost contingency factor, select the cost template, report layout, and approval requirements.
## Select the Cost Template, Report Layout and Approval Requirements
Once the well or facility has been selected, the next step is to set the cost contingency factor, select the cost template, report layout, and approval requirements.
 ### Cost Contingency Factor
Edit the **Cost Contingency Factor** that will be used for this job. The Cost Contingency Factor will determine the rate that contingency costs (intangible and tangible if applicable) are automatically calculated during the job.
The Cost Contingency Factor default value can be set separately for each job type.
If your team has a cost account for contingencies, that account will be updated automatically each time a new cost is recorded. For example, if you have a Contingency Account for Intangible Costs, you can set the Cost Contingency Factor at 10%. This means that each time a new cost of \$50,000 is added to an intangible account on a report, the contingency account will be updated by \$5,000.
The **Cost Contingency Factor** default values can be updated by an Admin user on the *Administration* page under the *Settings* tab.
### Select the Cost Template
Select the Cost Template from the dropdown list. This will determine which cost accounts are available for to assign costs to during the job.
Your organization may have multiple cost templates available for a job type. If you are not certain which to use, please reach out to your account administrator.
### Choose the Default Report Layout
RigReports offers multiple report layout options to include as much or as little data as you want in the distributed reports. Selecting the default report layout determines the report format you will see when previewing reports and the layout for the default distribution list that is automatically created for a job.
You can create as many distribution lists as you would like for a job, and a different report layout can be used for each.
The default report layout can be updated at any point in the job settings, and the report layout for each distribution list can also be updated at any time.
### Turn on/off Report Approval
Report approval requirement can be turned on or off using the toggle button next to **Report Approval Required**. Turning on report approval will allow you to select one or more approvers for the job (based on user permissions).
If Report Approval is **ON**, reports will not distribute each day until they have been approved by one of the authorized approvers that were selected. Company representatives that are assigned to a job (but not approvers) will be allowed to create, edit and submit reports. Once submitted, authorized approvers will be sent an email notifying them the report is ready for approval. The approvers can then follow the link from the email to review and approve the report for distribution.
Report approval allows for engineers in the office to formally review and edit a report before it is distributed to interested parties.
If Report Approval is **OFF**, pending reports can still be viewed and edited at any time by non-report creators, but they will not be formally notified when a report is ready or have formal approval control.
Default report approval requirement and authorized approvers for a job type can be controlled in the *Administration Settings*.
## Assign AFE and Company Reps
On the next page of the job creation process, you will be able to assign an AFE/expense number and the company representatives for the job. Assigning company representatives determines who has access to create and edit reports for the job or who will be listed on the report as a supervisor.
### Assign or Create AFE
When it comes to assigning an AFE, you have 2 options:
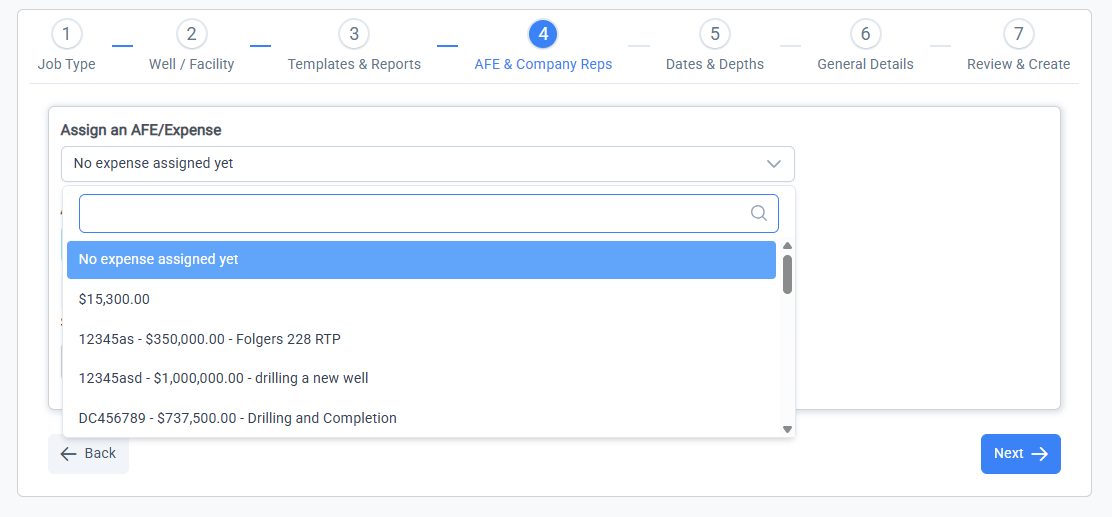
1. Select an AFE from the dropdown menu of already created AFEs available in RigReports for the well you selected.
2. Select *No Expense Assigned Yet* if the AFE will be created later or you will not be using an AFE for this job.
Adminstrators can create new AFEs or edit AFEs with budget details and individual account budgets from the \_AFE Management\_page.
The AFE can be changed or assigned at any point during the job.
### Cost Contingency Factor
Edit the **Cost Contingency Factor** that will be used for this job. The Cost Contingency Factor will determine the rate that contingency costs (intangible and tangible if applicable) are automatically calculated during the job.
The Cost Contingency Factor default value can be set separately for each job type.
If your team has a cost account for contingencies, that account will be updated automatically each time a new cost is recorded. For example, if you have a Contingency Account for Intangible Costs, you can set the Cost Contingency Factor at 10%. This means that each time a new cost of \$50,000 is added to an intangible account on a report, the contingency account will be updated by \$5,000.
The **Cost Contingency Factor** default values can be updated by an Admin user on the *Administration* page under the *Settings* tab.
### Select the Cost Template
Select the Cost Template from the dropdown list. This will determine which cost accounts are available for to assign costs to during the job.
Your organization may have multiple cost templates available for a job type. If you are not certain which to use, please reach out to your account administrator.
### Choose the Default Report Layout
RigReports offers multiple report layout options to include as much or as little data as you want in the distributed reports. Selecting the default report layout determines the report format you will see when previewing reports and the layout for the default distribution list that is automatically created for a job.
You can create as many distribution lists as you would like for a job, and a different report layout can be used for each.
The default report layout can be updated at any point in the job settings, and the report layout for each distribution list can also be updated at any time.
### Turn on/off Report Approval
Report approval requirement can be turned on or off using the toggle button next to **Report Approval Required**. Turning on report approval will allow you to select one or more approvers for the job (based on user permissions).
If Report Approval is **ON**, reports will not distribute each day until they have been approved by one of the authorized approvers that were selected. Company representatives that are assigned to a job (but not approvers) will be allowed to create, edit and submit reports. Once submitted, authorized approvers will be sent an email notifying them the report is ready for approval. The approvers can then follow the link from the email to review and approve the report for distribution.
Report approval allows for engineers in the office to formally review and edit a report before it is distributed to interested parties.
If Report Approval is **OFF**, pending reports can still be viewed and edited at any time by non-report creators, but they will not be formally notified when a report is ready or have formal approval control.
Default report approval requirement and authorized approvers for a job type can be controlled in the *Administration Settings*.
## Assign AFE and Company Reps
On the next page of the job creation process, you will be able to assign an AFE/expense number and the company representatives for the job. Assigning company representatives determines who has access to create and edit reports for the job or who will be listed on the report as a supervisor.
### Assign or Create AFE
When it comes to assigning an AFE, you have 2 options:
1. Select an AFE from the dropdown menu of already created AFEs available in RigReports for the well you selected.
2. Select *No Expense Assigned Yet* if the AFE will be created later or you will not be using an AFE for this job.
Adminstrators can create new AFEs or edit AFEs with budget details and individual account budgets from the \_AFE Management\_page.
The AFE can be changed or assigned at any point during the job.
 ### Assign Company Representatives
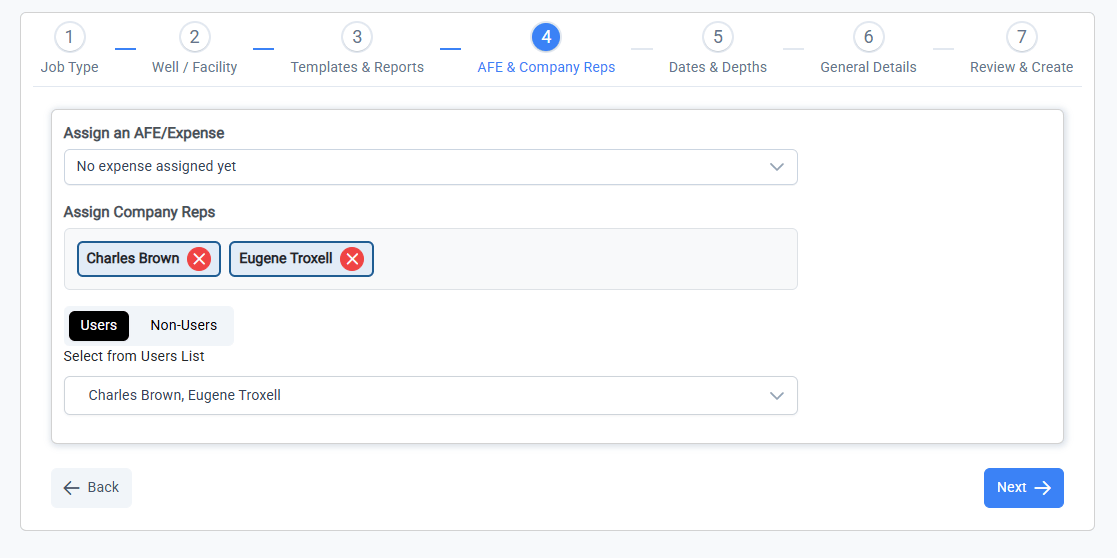
Company representatives for a job can be assigned from 2 groups:
1. From the **Users** list, select the users that will be entering reports and listed on the report as company reps. This determines which users have access to create and edit reports for the job. If a user has 3rd party permissions (outside of your organization) and is not assigned as a company rep, they will not be able to see or access the job.
2. From the **Non-Users** list, select Contacts to display on the report as Company Reps. These are personnel that need to be listed on the report as a representative on location, but do not have access to RigReports and will not be editing reports. This is typically used when company reps are using a shared or rig account.
If a contact does not exist and you would like to add them, click the **Create New Contact** button to create them and select them as a Non-User company rep. Creating a new contact will NOT give them a user profile or access to the RigReports application.
### Assign Company Representatives
Company representatives for a job can be assigned from 2 groups:
1. From the **Users** list, select the users that will be entering reports and listed on the report as company reps. This determines which users have access to create and edit reports for the job. If a user has 3rd party permissions (outside of your organization) and is not assigned as a company rep, they will not be able to see or access the job.
2. From the **Non-Users** list, select Contacts to display on the report as Company Reps. These are personnel that need to be listed on the report as a representative on location, but do not have access to RigReports and will not be editing reports. This is typically used when company reps are using a shared or rig account.
If a contact does not exist and you would like to add them, click the **Create New Contact** button to create them and select them as a Non-User company rep. Creating a new contact will NOT give them a user profile or access to the RigReports application.
 ## Set Start Date and Well Depths
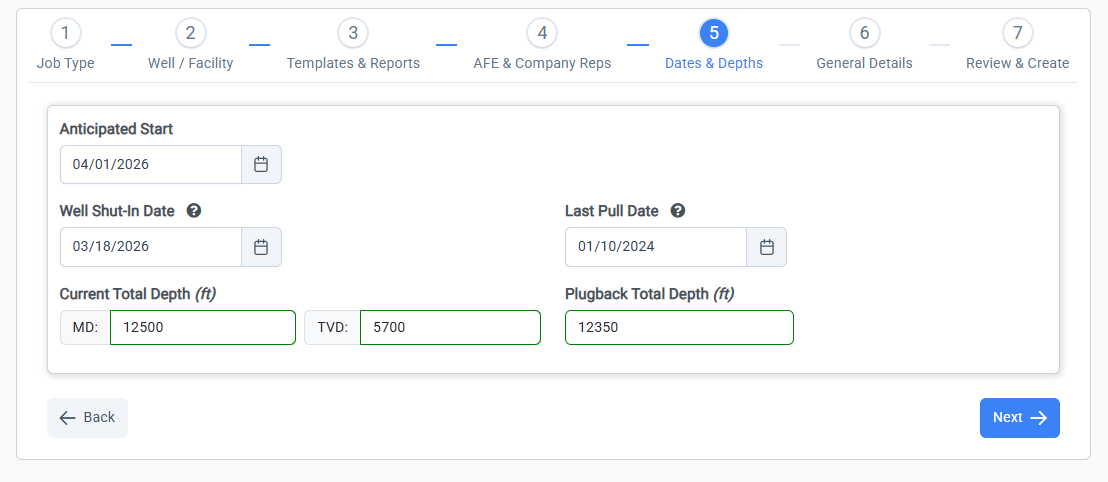
On the next page of the job creation process, you will be able to set the anticipated start date, well depths, and pull dates. The dates and depths options on this page will change based on the job type selected.
### Anticipated Start Date
The **anticipated start date** can be selected from the pop-out calendar. This date is only used for informational purposes within the application and has no effect on when the first report can be created.
### Workover - Well Shut-In Date and Last Pull Date
For Workover jobs, you can set the **shut-in date** and **last pull date** for the well.
Select the well **shut-in date** — this is when the well was shut-in for this workover.
Select the **last pull date** (if not already updated) for this well. If a previous job exists in RigReports for this well, the **last pull date** is updated automatically as the final day of the most recent job.
Workover reports will display **run time since last pull** (as days) in the header. This value is calculated as the number of days between **shut-in date** and **last pull date**.
### Workover/Completion/P\&A - Set the Total and Plug Back Depth
Update the **Total Depth (MD & TVD)** and **Plug Back Depth (MD only)**, if applicable, for the well.
If previous jobs or data are available in RigReports for this well, the **TD** and **PBTD** will be auto-filled.
## Set Start Date and Well Depths
On the next page of the job creation process, you will be able to set the anticipated start date, well depths, and pull dates. The dates and depths options on this page will change based on the job type selected.
### Anticipated Start Date
The **anticipated start date** can be selected from the pop-out calendar. This date is only used for informational purposes within the application and has no effect on when the first report can be created.
### Workover - Well Shut-In Date and Last Pull Date
For Workover jobs, you can set the **shut-in date** and **last pull date** for the well.
Select the well **shut-in date** — this is when the well was shut-in for this workover.
Select the **last pull date** (if not already updated) for this well. If a previous job exists in RigReports for this well, the **last pull date** is updated automatically as the final day of the most recent job.
Workover reports will display **run time since last pull** (as days) in the header. This value is calculated as the number of days between **shut-in date** and **last pull date**.
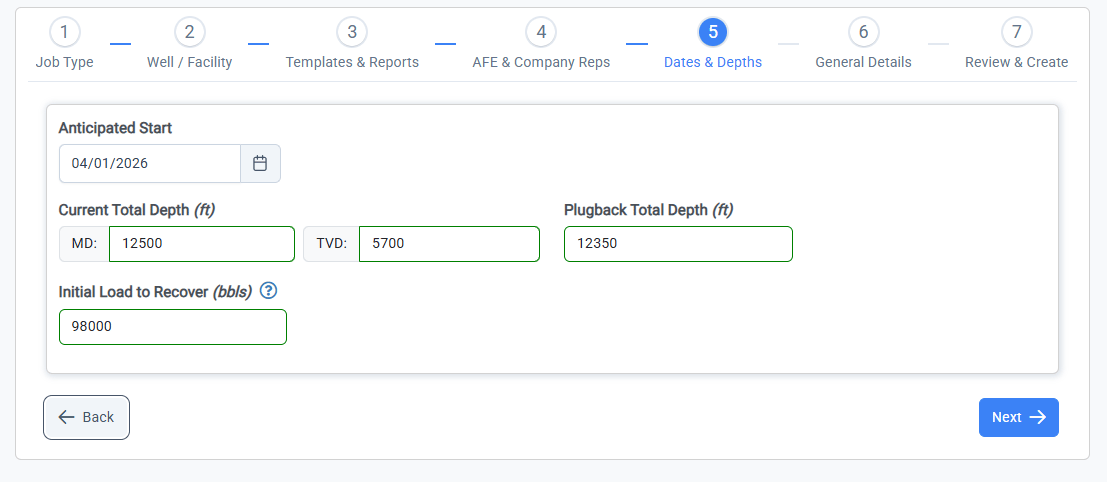
### Workover/Completion/P\&A - Set the Total and Plug Back Depth
Update the **Total Depth (MD & TVD)** and **Plug Back Depth (MD only)**, if applicable, for the well.
If previous jobs or data are available in RigReports for this well, the **TD** and **PBTD** will be auto-filled.
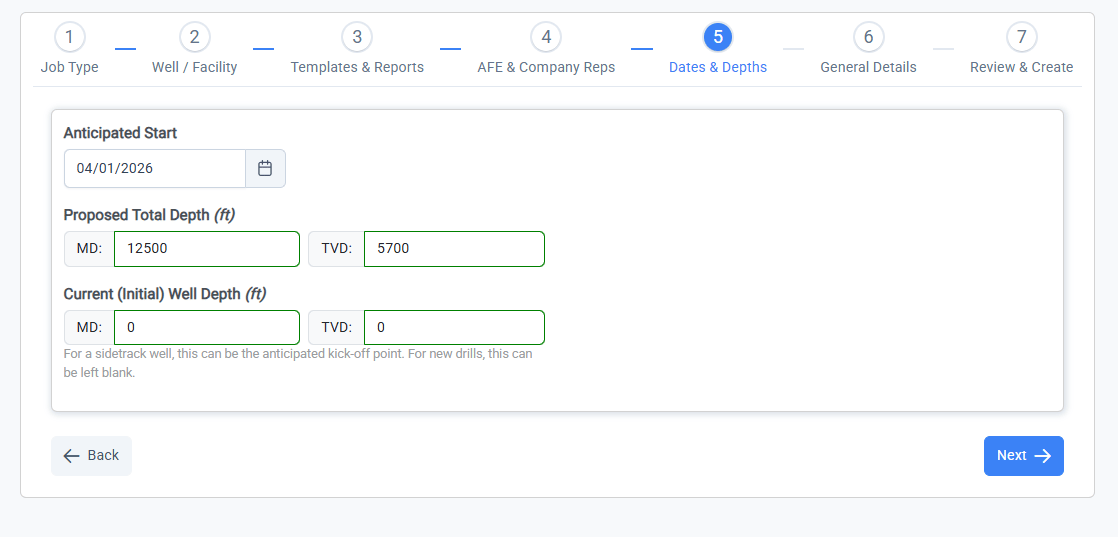
 ### Drilling - Proposed and Initial Depths
For Drilling jobs, set the Proposed total depth for the well and the current (or initial) depths for the well.
Don't forget to record Measured Depth and True Vertical Depth for these values.
If a drilling job is being performed on an existing wellbore (i.e. a sidetrack), the initial depth can be set to the anticipated kick-off point. With this, all daily progress values and days vs. depth plots will begin at this point, preventing false values for the initial daily progress.
For drilling jobs on wells with no job history, the current (initial) depths will default to 0' MD / 0' TVD. If a drilling job is performed on a well with previous job history, the current depth will be set to the last known depth of the well (based on previous jobs).
### Drilling - Proposed and Initial Depths
For Drilling jobs, set the Proposed total depth for the well and the current (or initial) depths for the well.
Don't forget to record Measured Depth and True Vertical Depth for these values.
If a drilling job is being performed on an existing wellbore (i.e. a sidetrack), the initial depth can be set to the anticipated kick-off point. With this, all daily progress values and days vs. depth plots will begin at this point, preventing false values for the initial daily progress.
For drilling jobs on wells with no job history, the current (initial) depths will default to 0' MD / 0' TVD. If a drilling job is performed on a well with previous job history, the current depth will be set to the last known depth of the well (based on previous jobs).
 ### Flowback - Initial Load
For Flowback jobs, set the **Initial Load to Recover** for the well. This is the volumue of frac fluid that was pumped into the well during the completion stages and is expected to be recovered during the flowback job.
### Flowback - Initial Load
For Flowback jobs, set the **Initial Load to Recover** for the well. This is the volumue of frac fluid that was pumped into the well during the completion stages and is expected to be recovered during the flowback job.
 ## Set Job Name, Objective, Permit #, and Notes
Finally, you can set the **Job Name**, **Job Objective**, **Permit #**, and **Notes** for the job.
### Workover/Completion - Job Objective and Failure Cause
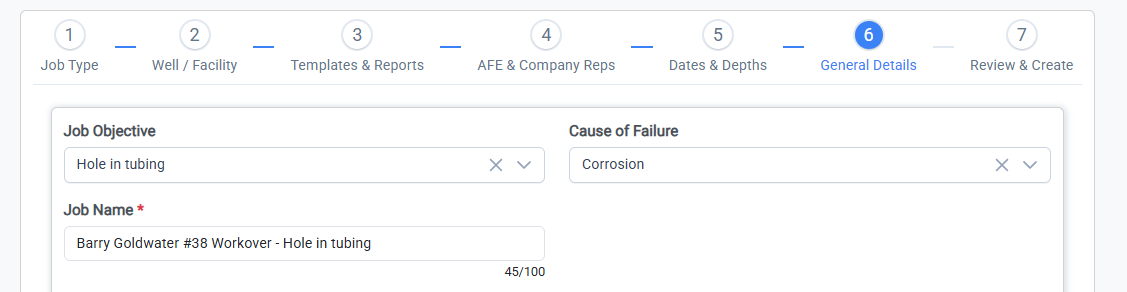
For Workover jobs, select the **Job Objective** and **Failure Cause** for the job from the dropdown options. For Completion jobs, enter the **Job Objective** in the text field.
Select the **job objective** of the workover. This will display in the job title to help distinguish jobs performed on wells.
Select the reason for the **well failure** that caused the workover job to be necessary.
The list of **Job Objectives** and **Failure Causes** can be customized for your organization from the *Administration* page under the *Dropdowns* tab.
## Set Job Name, Objective, Permit #, and Notes
Finally, you can set the **Job Name**, **Job Objective**, **Permit #**, and **Notes** for the job.
### Workover/Completion - Job Objective and Failure Cause
For Workover jobs, select the **Job Objective** and **Failure Cause** for the job from the dropdown options. For Completion jobs, enter the **Job Objective** in the text field.
Select the **job objective** of the workover. This will display in the job title to help distinguish jobs performed on wells.
Select the reason for the **well failure** that caused the workover job to be necessary.
The list of **Job Objectives** and **Failure Causes** can be customized for your organization from the *Administration* page under the *Dropdowns* tab.
 ### Job Name
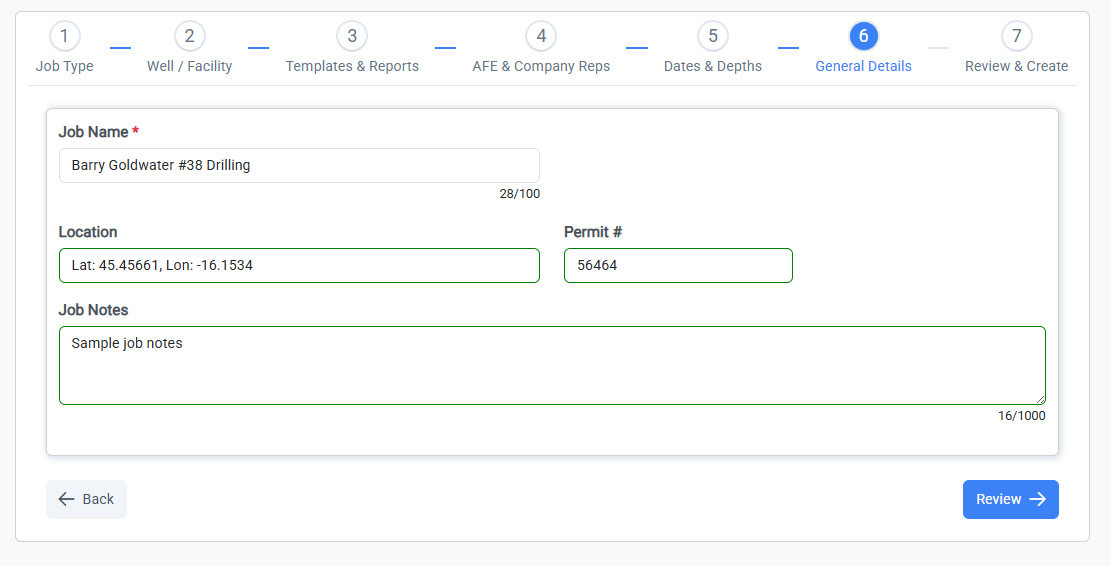
A default **job name** is created based on the well name, job type, and job objective (if applicable). This name can be modified.
### Enter Location, Permit, and Job Notes
If you would like to display **Location**, **Permit**, or additional **Job Notes** on the reports, that information can be entered at this time. The **Location** field is auto-populated with the well location, if set.
This information can be updated at any point during the job.
### Job Name
A default **job name** is created based on the well name, job type, and job objective (if applicable). This name can be modified.
### Enter Location, Permit, and Job Notes
If you would like to display **Location**, **Permit**, or additional **Job Notes** on the reports, that information can be entered at this time. The **Location** field is auto-populated with the well location, if set.
This information can be updated at any point during the job.
 ## Review and Submit New Job
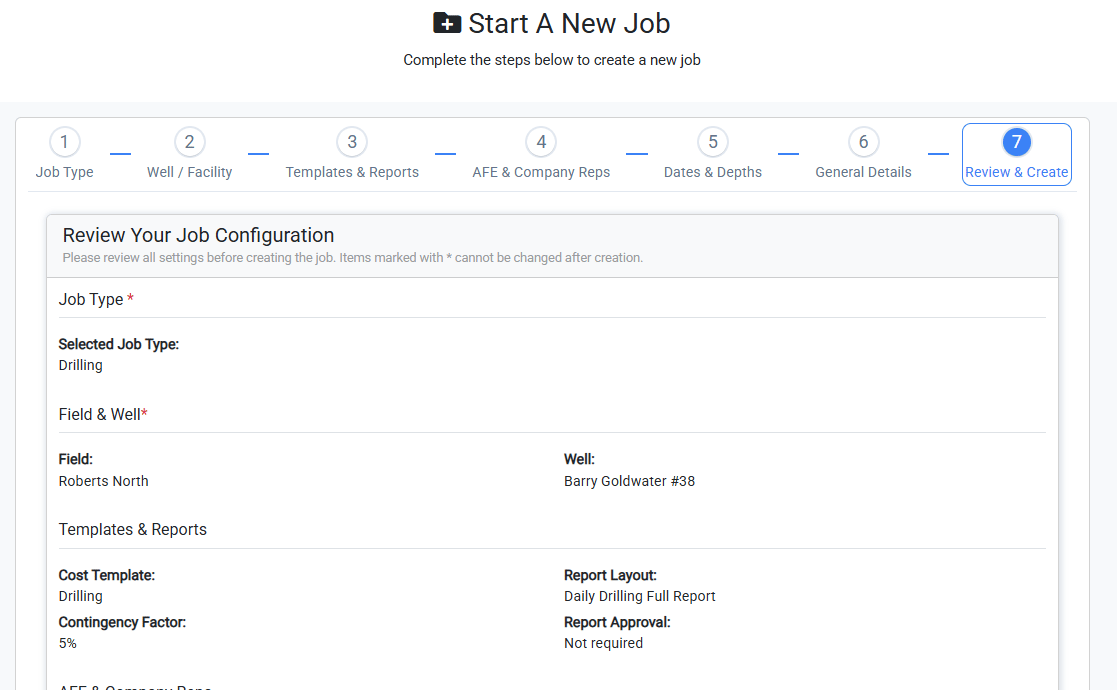
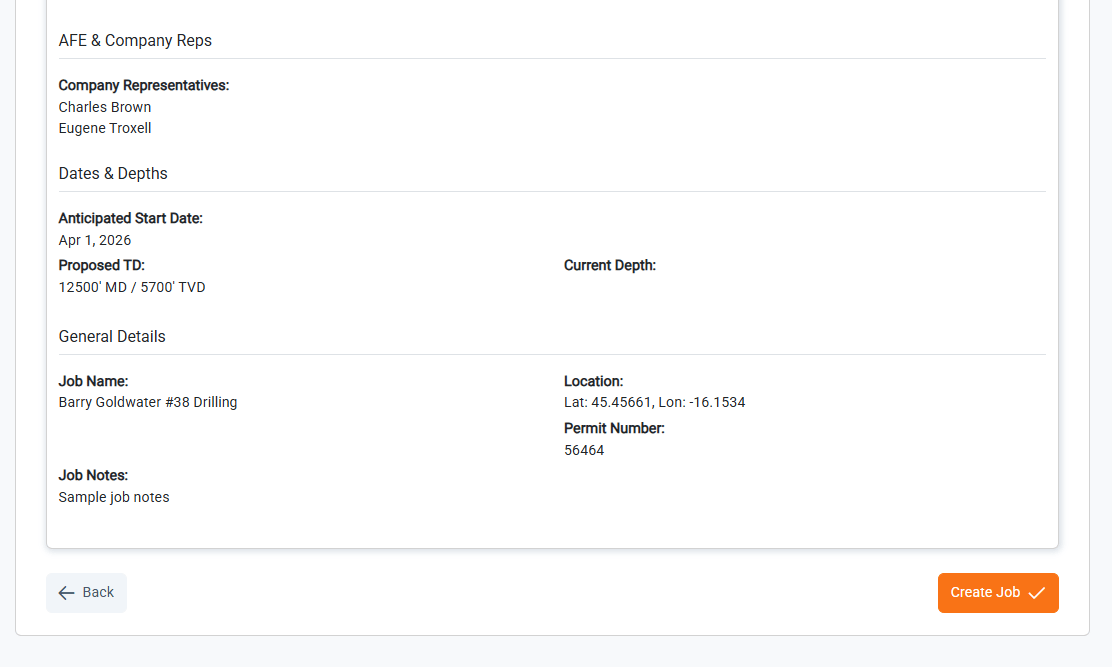
From the **Review** page, you can review all of the information entered for the new job.
Once you have reviewed all of the create job information, click **Create Job** to begin working on your new job.
If any required fields are incomplete or contain errors, the **Create Job** button will be disabled and a notification will display which fields need attention. Click the back **Edit** next to any fields that need to be updated.
## Review and Submit New Job
From the **Review** page, you can review all of the information entered for the new job.
Once you have reviewed all of the create job information, click **Create Job** to begin working on your new job.
If any required fields are incomplete or contain errors, the **Create Job** button will be disabled and a notification will display which fields need attention. Click the back **Edit** next to any fields that need to be updated.
 ## Success! Your new job has been created!
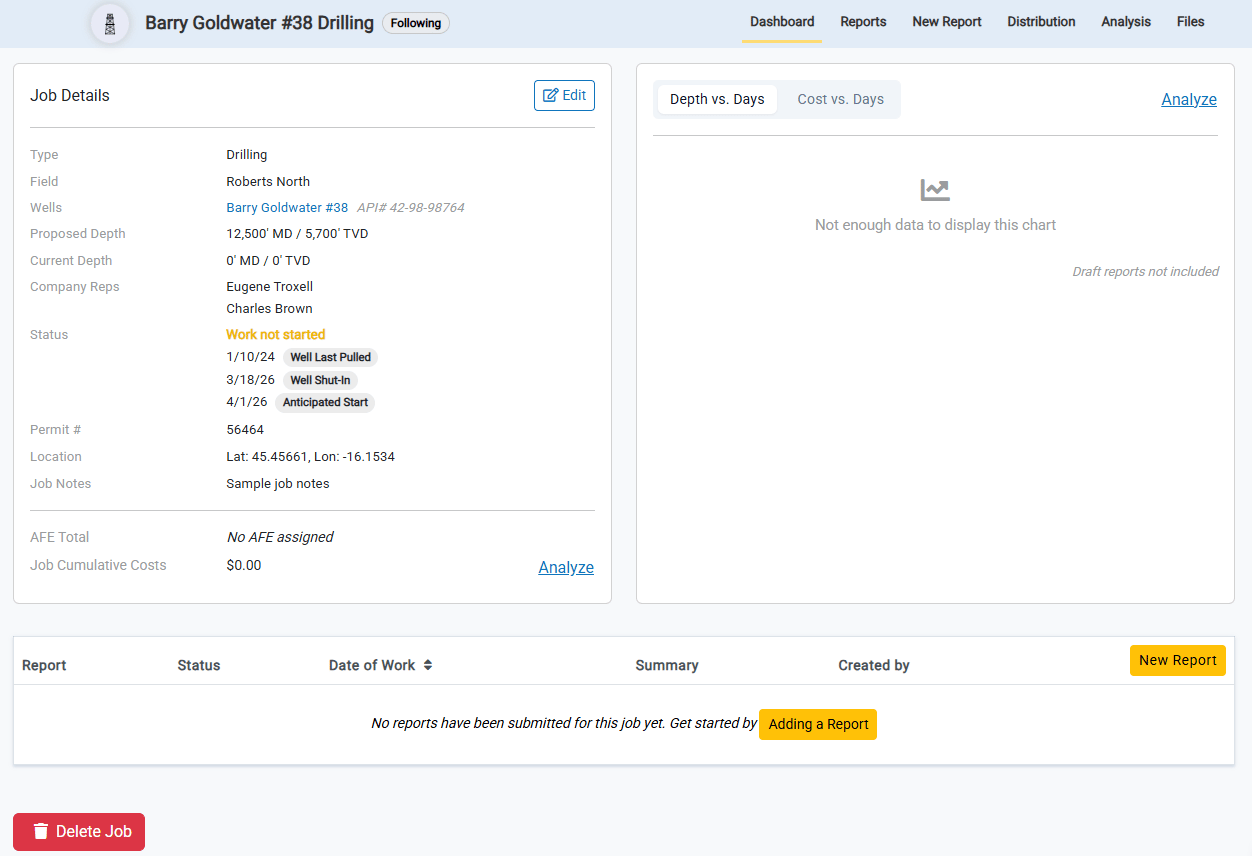
Once the job is successfully created, you will be redirected to the Dashboard page of your new job. You are now ready to start entering daily reports for your job.
## Success! Your new job has been created!
Once the job is successfully created, you will be redirected to the Dashboard page of your new job. You are now ready to start entering daily reports for your job.